꽃, 채소, 허브 등을 심을 수있는 완벽한시기 인 봄이 왔습니다! 원예 시즌이 다가오고 있으며 한창입니다. 정원 가꾸기를 처음 접하든, 노련한 녹색 엄지 손가락이 있든, 정원 가꾸기는 야외에서 더 많은 시간을 보내거나 실내 공간을 최대한 활용할 수있는 보람있는 방법이라는 것을 알고 있습니다! 정원 가꾸기는 재미 있지만 매우 어려울 수 있습니다. 많은 식물이 번성하기 위해서는 섬세하게 균형 잡힌 조건이 필요하기 때문에 미묘한 예술과 과학입니다. 이 원예 팁과 요령은 쉽고 저렴하며 올해 최고의 결과를 얻는 데 도움이 될 것입니다!
오래된 소다 병을 사용하여 드립 피더를 만드십시오.
 수분이 머리 위에서가 아니라 뿌리에서 전달되면 더 잘하는 식물 (특히 야채)이 있습니까? 공장 옆에 지하에 놓을 수있는 드립 피더를 만드는 저렴하고 간단한 방법 중 하나는 오래된 플라스틱 소다 병을 사용하는 것입니다. 구멍을 뚫고 (바비큐 꼬치가 잘 작동 함) 어린 식물 옆에 심습니다. 병은 뿌리 근처에서 천천히 물을 방출 할 수 있습니다. 이 방법은 곰팡이를 예방하고 잎 문제를 줄입니다. 자세한 내용은 소스를 확인하십시오. 나중에이 아이디어와 비슷하고 다른 애플리케이션에 유용한 아이디어를 더 공유 할 것입니다.
DIY 지침 및 프로젝트 크레딧 : Thegardeningcook
Pot-in-a-pot.
 pot-in-a-pot 방법은 많은 원예 문제를 해결하는 데 사용할 수있는 방법입니다. Florida Friendly Plants에 관한이 페이지에는이를 고려해야하는 20 가지 이유가 나와 있습니다. 융통성있는 정원 가꾸기에 탁월합니다 (식물을 거의 화나게하지 않고 쉽게 물건을 움직일 수 있습니다. 빛의 조건 등으로 실험하는 경우 좋습니다), 정원에 모래, 산호 바위 또는 침식 뿌리가있는 경우 완벽합니다. . 그것들은 그것을 시도하는 몇 가지 이유입니다. 시작하려면 위에 링크 된 페이지를 확인한 다음, pot-in-a-pot 방법에 대해 더 많이 알려줄이 업데이트 된 게시물을 살펴보십시오. 이것은 정말 내가 본 것 중 가장 간단하고 독창적 인 원예 아이디어 중 하나입니다!
DIY 지침 및 프로젝트 크레딧 : Floridafriendlyplants
올바른 방법으로 토마토에 물을주세요.
 토마토는 건조한 기후에서 자라기 어려울 수 있으며 오버 헤드 스프링클러로 토마토에 물을주는 것이 항상 잎에 가장 좋은 것은 아닙니다. 해결책? 믿거 나 말거나, 당신이 정말로 필요한 것은 몇 개의 구멍이 뚫린 쓰레기통과 퇴비로 가득 찬 삽 몇 개뿐입니다. 여기에서 사진과 방법을 확인하고 직접 시도해보십시오. 그 토마토 식물은 멋져 보입니다. 훌륭한 결과!
DIY 지침 및 프로젝트 크레딧 : Hometalk.com
절단으로 장미를 전파하고 감자에 장미를 키 웁니다.
 장미를 재배하는 가장 쉬운 방법 중 하나는 자르는 것입니다. 이 페이지에서는 기본 사항과 감자의 장미와 관련된 시원하고 매우 이상한 트릭을 알려줍니다. 맞습니다. 감자에서 장미를 키울 수 있습니다. 장미 절단을 감자에 붙인 다음 둘 다 땅에 밀어 넣습니다. 감자는 뿌리가 자라는 동안 절단 부위를 촉촉하게 유지합니다.
DIY 지침 및 프로젝트 크레딧 : 아마추어 원예
성형 콘크리트 화분 만들기.
 이전에 정원을 키운 콘크리트 블록을 기억하십니까? 여기 또 다른 비슷한 아이디어가 있습니다. 이번에는 처음부터 시작합니다! 맞습니다. 콘크리트 블록이 아니라 콘크리트입니다. 이것은 플라스틱 용기를 몰드로 사용하여 콘크리트 화분을 처음부터 만드는 매우 멋지고 창의적인 프로젝트입니다. 완성 된 결과는 정말 멋져 보입니다! 가장자리가 약간 거칠다는 사실이 정말 마음에 듭니다. 천년 후의 고고 학적 발굴지에서 찾을 수있는 것과 거의 비슷합니다.
DIY 지침 및 프로젝트 크레딧 : Radmegan
집에서 만든 정원 돌.
 정원 가게에서 당신은 아마도 그들에게 말이 적힌 귀여운 칠해진 강 바위를 보았을 것입니다. 무엇이 더 낫습니까? 직접 칠하는 정원 돌. 평평한 강 바위와 페인트와 마커가 필요합니다. 이 아이디어의 좋은 점은 심은 것의 이름을 포함하여 무엇이든 쓸 수 있다는 것입니다. 한 눈에 식물을 식별하는 데 아직 익숙하지 않거나 아직 발아하지 않았고 어디에 있는지 확실하지 않은 경우에 유용합니다.
DIY 지침 및 프로젝트 크레딧 : Diyncrafts
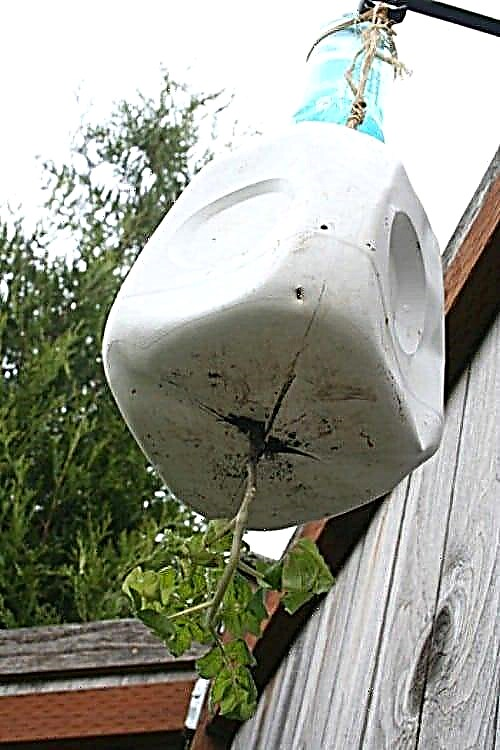
플라스틱 병 물통.
 이것은 이전의 슬로우 드립 병과 비슷합니다. 플라스틱 병을 가져와 바닥을 잘라내어 사용중인 화분과 같은 높이인지 확인합니다. 새싹을 심기 전에 흙에 넣고 더운 날에는 병에 물을 채 웁니다. 천천히 물속으로 떨어지고 뿌리까지 곧장 갈 것입니다. 이것은 식물 재배에 매우 도움이 될 수 있습니다. 물병 저장통을 최대한 활용하기위한 더 많은 팁과 요령은 출처 기사를 확인하십시오.
DIY 지침 및 프로젝트 크레딧 : Dabbletree
달걀 껍질로 식물을 키우고 보호하십시오.
 다음 번에 매운 알을 만들 때는 조개 껍질을 쓰레기통에 버리지 마세요! 달걀 껍질은 정원에서 유용합니다. 식물의 기저부에 뿌리면 칼슘으로 토양에 영양을 공급할 수 있습니다. 또한 달걀 껍질은 실제로 특정 곤충을 격퇴하여 식물을 해충으로부터 보호합니다. 아주 멋지다.
DIY 지침 및 프로젝트 크레딧 : Thechicsite
깨진 화분을 식물 마커로 재활용하세요.
 이전의 강 바위처럼 이것은 식물의 위치를 표시하는 또 다른 아이디어입니다. 그렇지 않으면 낭비 될 재료를 잘 활용하는 귀여운 아이디어입니다. 또한 충실한 화분이 깨지면 슬프고, 이렇게하면 정원의 일부로 보관할 수 있습니다. 여기에 추가 할 유일한주의 사항은 깨진 모서리가 날카 롭다는 것입니다. 아이들이 뛰어 다니는 경우 정원에서 원하는 것이 아닐 수도 있습니다.
DIY 지침 및 프로젝트 크레딧 : Wikihow
베이킹 소다를 사용하여 더 달콤한 토마토를 재배하십시오.
 많은 사람들이 토마토 재배를 좋아합니다. 토마토는 보통 슈퍼마켓에서 사는 것보다 훨씬 더 맛있고 달콤하기 때문입니다. 어떻게 더 달콤하고 맛있게 만들 수 있습니까? 베이킹 소다를 토양에 추가해보세요. 식물이 아닌 토양에만 뿌린다. 베이킹 소다는베이스이며 토마토의 산도를 방해합니다. 결과? 더 달콤한 토마토.
DIY 지침 및 프로젝트 크레딧 : Thegardeningcook
감귤 껍질에 묘목을 심습니다.
 이 심기 방법은 My Roman Apartment의 저자에 의해 발견되었습니다. 블로그 소유자는 1 년 동안 새 것을 사지 않겠다고 맹세했지만 결국 새 묘목을 심을 곳을 고민했습니다. 알다시피 속이 빈 감귤 껍질에 화분 용 흙이 들어있는 묘목을 성공적으로 자랄 수 있습니다. 감귤 껍질도 심는 것보다 땅에 묘목을 심을 준비가되었을 때 퇴비 더미에있는 껍질을 버리는 것이 좋습니다. 왜? 너무 많은 산도가 토양에 스며드는 것을 원하지 않습니다.
DIY 지침 및 프로젝트 크레딧 : Myromanapartment
딸기 타워를 건설하세요.
 맛있고 육즙이 많은 딸기를 많이 재배하고 그 과정에서 공간을 절약하고 싶다면 딸기 타워가 좋은 방법입니다. 이 설정에서 정말 흥미로운 점은 전체 타워를 통해 점차적으로 물을 떨어 뜨릴 수 있다는 사실입니다. 상단 냄비에 물병이 있습니다 (이전에 읽었던 것과 똑같습니다). 물은 상단 냄비를 통해 아래의 모든 냄비로 떨어집니다.
DIY 지침 및 프로젝트 크레딧 : Apieceofrainbow
나만의 조약돌을 만드십시오.
 조약돌은 어디에 두든 정말 매력적인 효과가 있습니다. 그들은 안뜰을 짓거나 정원을 통과하는 길을 만드는 데 좋습니다. 계획이 무엇이든이 간단한 튜토리얼은 처음부터 어떻게 할 수 있는지 보여줍니다. 사진은 명확하고 따라하기 쉽습니다. 사실,이 전체 프로젝트는 제가 생각했던 것보다 훨씬 간단합니다. 마당에 구식 매력을 더하는 것이 그렇게 쉬울 수 있다고 누가 생각했을까요?
DIY 지침 및 프로젝트 크레딧 : Tancamjenksfam
재활용 재료로 귀여운 정원 동물을 만드세요.
 이 페이지에는 재활용 재료로 사랑스러운 정원 동물을 만들기위한 흥미 진진한 프로젝트가 많이 있습니다! 나는 그 고슴도치를 좋아합니다. 꼬기 몇 개와 귀여운 작은 눈 두 개가 달린 플라스틱 병으로 만들어 졌다는 것이 놀랍습니다. 그는 화분을 두 배로 늘려서 식물이 그의 모피를 위해 서 있습니다! 수탉이 플라스틱 병으로 시작했거나 그 나비가 똑같이 시작했다는 것은 믿기 어렵습니다. 다른 종류의 병일뿐입니다. 이 프로젝트 중 어느 것이 가장 귀여운 지 말할 수는 없습니다! 그들은 모두 놀랍습니다!
DIY 지침 및 프로젝트 크레딧 : Diygardendecor
PVC 파이프로 격자를 만듭니다.
 마당에 격자를 추가하고 싶었던 적이 있습니까? 놀랍도록 쉬운 디자인 중 하나는 서로 연결된 PVC 파이프를 사용합니다. 이 아름다운 사진을 확인하십시오. 이 격자는 오이를 재배하는 데 사용되지만 그 위에 여러 가지를 재배 할 수 있습니다. 멋지게 보이고 작동합니다.
DIY 지침 및 프로젝트 크레딧 : Pvcplans
모기 방제 허브.
 모기가 정원이나 갑판에서 당신을 괴롭 히고 있습니까? 개박하, 레몬 그라스 등을 포함하여 자연적으로 그들을 격퇴하는 많은 허브가 있습니다. 이 중 하나 이상을 정원에 심으면 그 벌레를 빨리 제거 할 수 있습니다. 냄비에 넣고 안뜰이나 데크에서 키우면 시간을 보내고 싶은 곳에서 멀리 떨어 뜨릴 수 있습니다. 보너스로,이 허브는 모두 다른 용도로 유용하므로 음식 등을 위해 수확 할 수 있습니다. 이것은 모든 곳에 모기 구충제를 뿌리는 것보다 훨씬 건강한 대안입니다. 당신의 정원과 당신에게 더 좋습니다.
DIY 지침 및 프로젝트 크레딧 : Salisburygreenhouse
레몬 밤이 놀라운 이유를 알아보세요.
 정원에서 자라는 새로운 허브를 생각하고 계십니까? 레몬 밤 재배에 대해 생각해보세요! Ann ’s Entitled Life에 따르면 레몬 밤은 성장할 수있는 가장 유용한 허브 중 하나입니다! 모기 구충제 역할을하며 꿀벌이 꽃에 수분을 공급하는 데 도움이됩니다. 게다가, 그것은 많은 약용 용도를 가지고 있으며 다양한 요리법에 적합합니다. 포푸리와 아로마 테라피에도 좋습니다. 믿거 나 말거나 훌륭한 컨디셔너 또는 페이셜을 만듭니다. 기본적으로 생활의 모든 영역과 가정의 모든 영역에서 유용합니다.
DIY 지침 및 프로젝트 크레딧 : Annsentitledlife
모기를 격퇴하는 더 많은 식물.
 앞서 허브를 사용하여 모기를 퇴치하는 방법에 대해 이야기했습니다. 성가신 곤충을 쫓아 낼 더 많은 도움이되는 식물을 배우고 싶다면 여기를보세요. 모든 식물의 추가 이점과 그 밖의 용도에 대해 배울 수 있습니다. 이것은 훌륭한 가이드입니다.
DIY 지침 및 프로젝트 크레딧 : Naturallivingideas
쉬운 방법으로 정원에 물을 모으십시오.
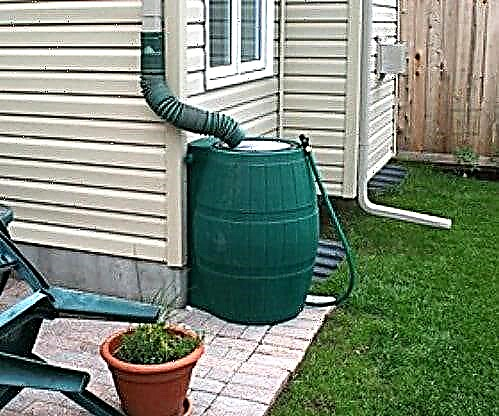 수도 요금이 높은 곳에 살고 있습니까? 원예 비용을 줄이는 한 가지 방법은 하늘에서 떨어지는 물을 이용하는 것입니다. 건조한 날에 식물에 물을 주어야한다면 자연 강수량을 활용하기 위해 빗물 저장통을 설치하는 것은 어떨까요? 물이 떨어지면 모으고 필요할 때 사용하십시오. 이것은 설정하기 쉬운 시스템이며 공과금을내는 데 적합합니다.
DIY 지침 및 프로젝트 크레딧 : Fivecentnickel ~의 사진 madmack66.
K- 컵을 시드 스타터로 사용하십시오.
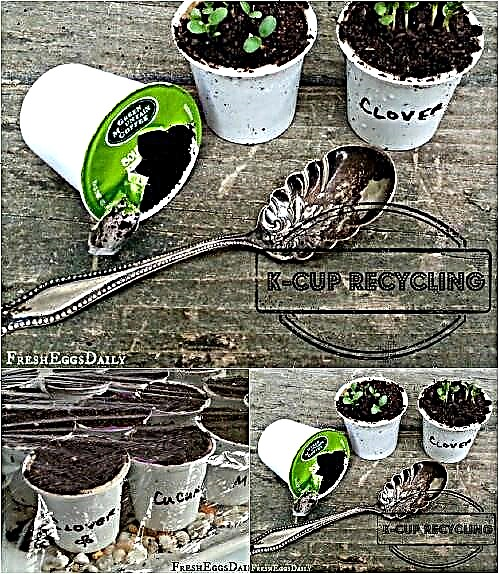 K- 컵을 사용해야하는 커피 메이커가 있습니까? 정원에서 잘 활용하지 않는 한 모든 K-Cup은 많은 쓰레기가됩니다. 종자 스타터에 적합한 크기입니다. 라벨을 붙이고 씨앗을 추가하고 싹이 날 때까지 기다리십시오.
DIY 지침 및 프로젝트 크레딧 : Fresheggsdaily
와인 코르크 식물 마커.
 식물 마커에 대한 멋진 아이디어가 너무 많습니다! 강 바위와 부서진 냄비는 매우 귀엽고 창의적이지만, 여기에 열렬한 와인을 마시는 사람들을위한 것이 있습니다 ... 와인 코르크! 마시는 와인의 코르크를 그대로두고 마커로 쓴 다음 그림과 같이 흙에 못을 박으십시오. 이것은 너무 귀엽고 정원에 대한 훌륭한 맞춤 터치입니다!
DIY 지침 및 프로젝트 크레딧 : Shineyourlightblog
플라스틱 병을 자 급식 종자 스타터로 바꾸십시오.
 나는 오래된 플라스틱 소다 병을 사용하여 식물에 물을주는 방법에 대해 이야기했지만, 스스로 물을주는 종자 스타터로 바꿀 수도 있다는 것을 알고 계셨습니까? 이것은 몇 가지 과학 원리를 가르치는 멋진 프로젝트이므로 자녀와 함께하기에 완벽합니다. 페트병을 반으로 자른 다음 위쪽 절반을 아래쪽 절반 안쪽에 거꾸로 놓습니다. 바닥 챔버에서 수분이 응축됩니다. 병 뚜껑에 구멍을 뚫는 구멍을 통해 실 조각을 보내면 수분이 위로 올라갑니다. 이것은 실내에서 원예 프로젝트를 시작하는 재미있는 방법입니다.
DIY 지침 및 프로젝트 크레딧 : Diyncrafts
무거운 실외 화분의 무게를 줄입니다.
 일단 가득 차면 재배치하려고 시도하는 매우 무거운 거대한 야외 화분 중 하나가 있습니까? 앞으로 이러한 야외 식물의 무게를 줄이는 한 가지 쉬운 방법은 바닥 부분을 거품 땅콩으로 채운 다음 그 위에 흙을 두는 것입니다. 이것은 무게를 상당히 줄이고 실제로 토양의 배수를 향상시킵니다. 얼마나 멋진가요? 식물에 더 자주 물을 주어야 할 것입니다.
DIY 지침 및 프로젝트 크레딧 : Familyhandyman
플라스틱 통을 미니 온실로 사용하십시오.
 투명한 플라스틱 통은 거의 모든 것에 굉장합니다. 밝혀진 바와 같이, 그들의 많은 응용 중 하나는 원예에 있습니다. 이 쓰레기통은 묘목 재배를위한 미니 온실로 아름답게 사용할 수 있습니다! 저렴하고 다재다능하며 오프 시즌에 다른 용도로 사용할 수 있기 때문에 초보자를위한 최고의 원예 팁 및 트릭 중 하나입니다.
DIY 지침 및 프로젝트 크레딧 : Prairiecottagerose
민달팽이를 죽이는 여러 가지 방법을 알아보십시오.
 슬러그가 정원의 주요 해충 문제인 경우 여기에서 슬러그를 죽이는 다양한 방법을 배울 수 있습니다. 대부분의 정원사는 거의 모든 것을 먹을 것이기 때문에 민달팽이의 팬이 아닙니다. 그러나 그들을 죽이려고 서두르 기 전에 생태 학적 이점에 대해 읽어보십시오. 민달팽이가 모두 나쁘지는 않습니다. 몇 개만 있다면 그대로두고 싶을 것입니다. 그들은 죽은 물질을 먹고, 식물 번식에 도움이되는 씨앗을 뿌리고, 질소 재활용을 돕습니다.
DIY 지침 및 프로젝트 크레딧 : Thisgardenisillegal
이 튜토리얼을 통해 토마토에 활기를 불어 넣으세요.
 채소 원예 팁을 찾고 계십니까? 이 인기 YouTube 비디오 토마토를위한 슈퍼 스타터 비료를 만드는 방법을 알려줄 것입니다. 재료는 모두 일반적이고 저렴합니다. 완성 된 비료 혼합물의 합산 비용에 대해 불만을 제기하는 일부 댓글 작성자가 있지만, 이것은 대량 토마토 비료를위한 대량 배치라는 점을 명심하십시오. 실제 토마토 농장이 있다면 말이되며 좋은 작물을 생산하는 데 도움이된다면 돈을 절약 할 수도 있습니다. 그렇지 않다면 더 작은 배치를 만드십시오! 이것은 당신에게 돈을 절약 할 것입니다!
편리한 인포 그래픽으로 퇴비에 대해 알아야 할 모든 것을 알아보세요.
 퇴비입니까? 그렇지 않으면이 인포 그래픽이 마음을 바꿀 것입니다. 보시다시피, 1 입방 야드의 퇴비는 추정 가치가 $ 562입니다. 그것은 비료, 유기물, 식물 성장 호르몬 및 기타 원예 용품에 대해 그것 없이는 지불 할 것입니다. 또한 자신의 정원을 훨씬 뛰어 넘는 퇴비 사용 환경에 대한 놀라운 이점을 배우게됩니다. 퇴비 통에 재료를 쌓을 수있는 최적의 방법을 발견하고 마지막으로 퇴비를 만들 수있는 것과 할 수없는 것을 알려주는 빠른 안내서를 받게됩니다. 이것은 초보 정원사에게 놀라운 자원입니다!
DIY 지침 및 프로젝트 크레딧 : 수정
씨앗이 여전히 심기에 좋은지 알아보십시오.
 심을 생각을하고있는 오래된 씨앗이 주위에 놓여 있다면, 자라게하지 않으려면 많은 시간을 낭비하고 싶지 않습니다. 시간을 낭비하지 않는지 확인하는 쉬운 방법 중 하나는 젖은 종이 타월을 사용하는 것입니다. 예를 들어 의류 건조기 위와 같이 따뜻한 곳에 젖은 종이 타월을 놓습니다. 몇 개의 씨앗을 위에 놓고 다음 며칠 동안 어떤 일이 일어나는지 확인하십시오. 싹이 트는 것이 보이면 계속해서 배치를 심으십시오! 그렇지 않다면 창문이 지나간 것입니다. 이것은 시간을 대폭 절약하고 비용도 절약 할 수 있습니다. 어떤 씨앗이 여전히 좋은지 놀랄 것입니다. 어떤 씨앗은 몇 년 동안 지속됩니다!
DIY 지침 및 프로젝트 크레딧 : Food52
정원에 돌을 새기십시오.
 내가 전에 공유했던 칠해진 강 바위를 기억하십니까? 돌에 쓰는 또 다른 좋은 방법은 돌에 직접 조각하는 것입니다. 이 사랑스러운 가족 바위를보세요 (귀여운 말장난도!). 정원 바위에 무엇이든 조각 할 수 있으며 식물 마커로 사용할 수도 있습니다.
DIY 지침 및 프로젝트 크레딧 : Serenityhealth
묘목 용 화장지 롤의 용도를 변경하십시오.
 이것들은 굉장합니다! 누구나 집에 화장지 롤이 있습니다. 빈 롤을 버리지 않고 모으기 시작하면 묘목 스타터에 좋은 재료가 될 것입니다. 몇 번 자르고 아래 부분을 접고 테이핑하는 간단한 문제로 보입니다. 그들은 완벽한 크기입니다!
프로젝트 크레딧 : Stacie
이 놀라운 야채 재배 치트 시트를 확인하십시오.
 이 놀라운 인포 그래픽은 즉시 채소 재배를 시작할 수있게 해줍니다! 플롯 정원에서 가장 잘 자라는 채소와 안뜰 정원에 가장 적합한 채소를 찾으십시오. 아래로 스크롤하면 야채를 위협하는 일반적인 해충과 특정 야채 재배에 대한 팁에 대해 알아볼 수 있습니다. 파종을 위해 직사광선이 필요한 식물, 필요한 간격, 발아 및 성숙에 걸리는 시간 등을 알아보십시오. 또한 씨앗을 심고 채소를 수확 할 적절한시기를 배우게됩니다. 마지막으로, 동반자 심기에 대한 가이드는 공간을 최대한 활용하고 해충을 방지하기 위해 함께 배치 할 식물을 알려줍니다.
DIY 지침 및 프로젝트 크레딧 : Anglianhome
젓가락으로 식물에 라벨을 붙입니다.
 다음은 식물에 라벨을 붙이는 빠르고 쉽고 저렴한 방법입니다. 다음 번에 중국식 테이크 아웃을 사러 나갈 때 값싼 젓가락을 버리지 마십시오. 대신 씻어서 저장하십시오. 씨앗 패킷을 붙인 다음 각 식물 옆의 토양에 붙일 수 있습니다. 그것보다 더 간단하지 않습니다.
DIY 지침 및 프로젝트 크레딧 : Thisoldhouse
팔레트를 화분으로 바꾸십시오.
 팔레트는 놀라운 것입니다. 백 가지 목적으로 집이나 마당 전체에서 사용할 수 있습니다. 아름답고 유용한 용도로 사용할 수있는 한 가지 방법은 정원에서 화분으로 바꾸는 것입니다! 이것은 매우 쉬운 프로젝트이며 매우 저렴합니다. 또 다른 좋은 점은 공간 절약에 좋다는 것입니다. 수직 디자인은 모든 위치에 완벽합니다. 정원을 만들 수있는 아주 작은 마당이나 안뜰이 있더라도 이런 식으로 많은 식물을 재배 할 수 있습니다.
DIY 지침 및 프로젝트 크레딧 : Diyncrafts
깨진 화분을 사용하여 멋진 요정 정원을 만드세요.
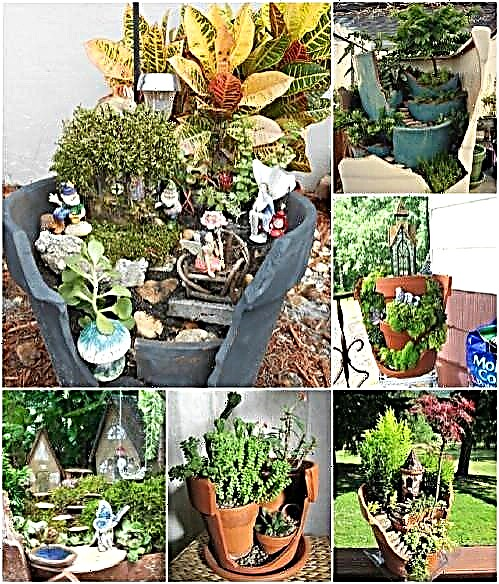 당신은 당신의 정원에두기 위해 살 수있는 작은 요정 집을 알고 있습니까? 냄비에 멋진 요정 정원을 만들고 싶다면 깨진 정원부터 시작하십시오. 이 링크에서 정확한 방법을 볼 수 있습니다. 측면의 큰 조각을 떼어 내고 깨진 냄비에 흙을 약간 넣고 조각을 약간 비스듬히 넣은 다음 작은 세라믹 조각을 채우고 추가합니다 (예 : 같은 냄비에서 나온 것). 계단을 형성합니다. 그런 다음 식물과 요정의 집 등 원하는 것을 마음껏 추가하세요. 해당 페이지에서 수행 할 수있는 작업에 대한 엄청난 예가 있습니다! 보시다시피이 테마에는 많은 변형이 있습니다. 아이디어는 테라스 세트를 만들어 마법의 것으로 바꾸는 것입니다.
DIY 지침 및 프로젝트 크레딧 : Boredpanda
루팅 장미를위한 완벽한 DIY 원예 기술
전 세계의 거의 모든 사람들이 장미를 좋아하고 집에 장미를 두는 것은 장미의 아름다움과 멋진 향기를 즐길 수있는 좋은 방법입니다.
심는 것이 어려울 필요는 없습니다. 사실, 그 장미를 뿌리 내리는 정말 쉬운 DIY 기술이있어 식물에서 잘라내어 스스로 자라기 시작할 수 있습니다. 장미 덤불이 여러 개있는 경우이를 약간 펼칠 수있는 좋은 방법입니다.
플라스틱 용기, 2 리터 소다 병, 루팅 호르몬, 칼과 가지 치기, 약간의 화분 용 흙이 필요합니다.
Hartwood Roses는 단계별로 제공하며 매우 간단하므로 항상 장미를 원했다면 장미를 얻을 수있는 좋은 방법입니다. 이 기술을 사용하여 정원 주변에 심기 위해 장미 뿌리를 시작하십시오.
DIY 지침 및 프로젝트 크레딧 : hartwoodroses
플라스틱 병으로 물 뿌리개 만들기.
 여기 정원에있는 오래된 플라스틱 병에 대한 또 다른 용도가 있습니다. 압정으로 병 길이 주위에 구멍을 뚫고 회전하고 여러 번 반복하십시오. 호스를 안으로 밀어 넣고 테이프를 붙여 연결을 밀봉하고 물을 켭니다. 자세한 내용은 비디오 LifeHacker에서.
놀라운 DIY birdfeeders.
 집에 이미 가지고있을 것 같은 물건으로 자신 만의 새 모이통을 만드는 것이 쉽다는 것을 알고 계셨습니까? 여기에서 확인하실 수있는 아름답고 창의적인 예를 많이 모았습니다. 나는 찻잔과 접시가있는 첫 번째 것을 좋아합니다. 매우 귀엽고 약간의 그늘도 제공합니다. 다른 조류 모이는 찻잔, 주전자, 신발 등으로 만들어집니다! 이 중 일부는 새집 아이디어로도 사용할 수 있습니다.
DIY 지침 및 프로젝트 크레딧 : Diyncrafts
오래된 바퀴를 멋진 모자이크 화분으로 바꾸세요.
 이 프로젝트의 변화는 놀랍습니다! 왼쪽을 보면이 우아한 모자이크 화분이 어떻게 오래된 바퀴로 삶을 시작했는지 알 수 있습니다. 프로젝트의 제목과 주제가 아니었다면 아마도 연결조차하지 않았을 것이고 화분이 바퀴로 만들어 졌다는 것을 깨달았을 것입니다! 완전히 다르게 보입니다. 예술적인 마음을 가진 정원사에게 완벽한이 얼마나 놀라운 프로젝트입니까? 멋진 점은 바퀴가 실제로 용기 역할을하는 것 이상의 기능적 목적을 가지고 있다는 것입니다. 바퀴는 완벽한 배수를 제공합니다!
DIY 지침 및 프로젝트 크레딧 : Plantcaretoday
오래된 청바지를 정원 앞치마로 바꾸십시오.
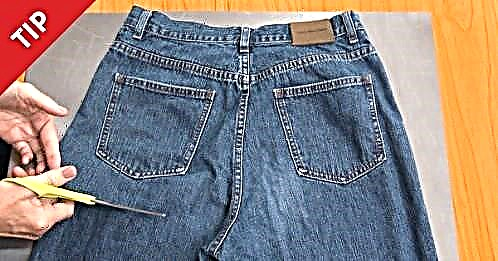 흙 속에 무릎을 꿇고있는 동안 옷을 깨끗하게 유지할 수있는 옷을 정원에서 닳게하고 싶습니까? 낡은 청바지가 주위에 누워 있다면, 가위만으로 몇 초 만에 정원 앞치마로 바꿀 수 있습니다! 비디오를 확인하십시오. 시간과 돈을 절약하는 얼마나 좋은 방법입니까!
DIY 지침 및 프로젝트 크레딧 : Diyncrafts
벌새를 정원으로 끌어들입니다.
 벌새는 화려하고 꽃에서 꽃을 피우며 날아 다니는 모습을 보는 것이 너무나 재미 있지만,보기 힘든 생물 일 수 있습니다. 벌새 모이통을 살 수는 있지만, 많은 정원사는 내부의 음식이 개미 (대부분 설탕으로 만들어져 있음)를 끌어들이는 단순한 이유 때문에 그것들을 좋아하지 않습니다. 정원에 벌새를 그리는 또 다른 방법이 있습니다. 벌새를 유인하는 꽃을 심 으세요! 이 링크는 15 가지 훌륭한 옵션을 제공합니다. 이것들은 모두 아름다운 식물이며 정원에 색을 더할 것입니다!
DIY 지침 및 프로젝트 크레딧 : Hgtvgardens
화분을 아름답게 만드십시오.
 여전히 유용하지만보기에는별로 재미가없는 오래된 화분이 있습니까? The Sweet Escape의이 프로젝트는 재배자를 아름다운 것으로 바꾸는 재미 있고 빠르고 쉬운 방법입니다. 단색으로 스프레이 페인팅하는 대신 (여전히 나쁜 생각은 아닙니다)이 프로젝트를 사용하면 각 화분에 간단한 패턴과 하나 이상의 색상을 적용 할 수 있습니다. 최종 결과는 놀랍습니다. 메탈릭 페인트는 진정한 반짝임과 빛을 더합니다.
DIY 지침 및 프로젝트 크레딧 : Thesweetescape
커피 필터를 사용하여 새는 화분에 먼지가 사방에 묻지 않도록하십시오.
 화분을 집 어서 옮기는 것이 싫지 않습니까? 바닥에 흙이 새어 나가는 것뿐입니다. 누출을 잡을 수있는 트레이가 있어도 여전히 지저분한 과정이 될 수 있습니다. 관엽 식물의 배수에 영향을주지 않고 이것을 막을 수있는 한 가지 방법은 각 냄비의 바닥에 커피 필터를 추가하는 것입니다. 이것은 뿌리 시스템이 아직 발달하지 않은 어린 식물의 대부분 문제입니다. 새 필터를 사용하기 위해 튀어 나올 필요가없는 오래된 커피 필터를 사용할 수 있습니다. 그들은 생분해되지만 일반적으로 식물 뿌리가 발달하고 토양이 그렇게 많이 새지 않기 때문에 대체 할 필요가 없습니다.
DIY 지침 및 프로젝트 크레딧 : Thisoldhouse
와인 병으로 쉽게 급수 해킹.
 화분에 닿는 순간 물이 증발하는 더운 달 동안 정원에 물을주고 토양을 촉촉하게 유지하는 쉬운 방법을 찾고 계십니까? 빠르고 쉬운 해킹이 있습니다. 빈 와인 병이나 맥주병을 잡고 물로 채우고 거꾸로 뒤집은 다음 빠르게 화분 안에 넣습니다. 물은 병에서 토양으로 천천히 이동합니다. 그것은 당신에게 물을주는 일을 절약 할 수 있습니다. 여기에서 이에 대한 비디오를보십시오.
출처 : Thegreenists Youtube
많은 시멘트 블록을 정원 침대로 바꿉니다.
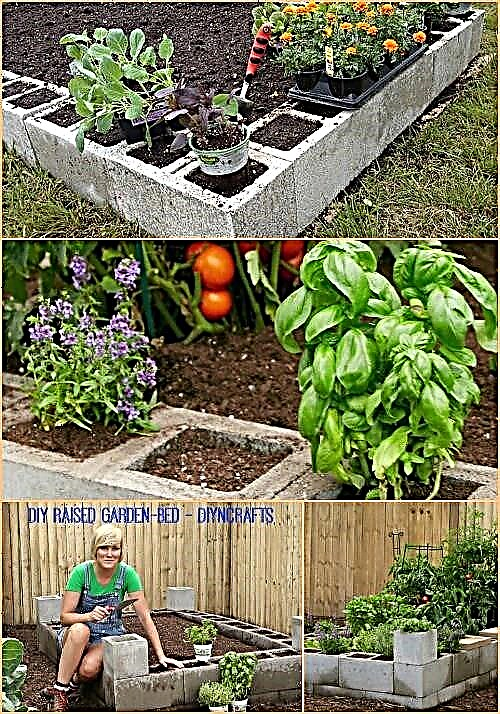 제기 정원 침대는 굉장합니다. 멋지게 보이며 허리에 문제가 있고 식물을 돌보기 위해 몸을 구부릴 필요가없는 경우 작업하기가 더 쉬울 수 있습니다. 하나를 만드는 쉬운 방법 중 하나는 시멘트 블록을 사용하는 것입니다. 이것은 평방 피트 정원에도 적합합니다. 각 블록은 기본적으로 이미 화분 역할을하고 있으며, 원하는 것을 중간에 놓을 수 있습니다.
DIY 지침 및 프로젝트 크레딧 : Diyncrafts
행잉 포켓 오거나이저를 수직 정원으로 바꾸십시오.
 이 아이디어는 천재입니다! 옷장 문 안쪽에 붙여 신발을 보관할 수있는 것과 같은 종류의 걸이 형 주머니 정리함입니다. 정리 매장에서 싸게 살 수 있고, 바깥에 걸어 놓고 각 주머니를 식물에 사용할 수 있습니다. 이것은 땅에있는 식물을 방해하는 것을 좋아하는 고양이와 다른 해충에 대한 훌륭한 억제책 일뿐만 아니라 훌륭한 공간 보존 기술이며 작은 아파트 발코니에 허브 나 꽃밭을 갖고 싶을 때 이상적입니다.
DIY 지침 및 프로젝트 크레딧 : Instructables
잎에서 다육 식물을 전파하십시오.
 다육 식물은 자신의 잎에서 싹이 트는 식물 중 하나입니다. 따라서 집에 다육 식물이있는 경우 이미 소유 한 잎사귀를 사용하여 실제로 새 즙을 재배 할 수 있습니다. Succulents & Sunshine은 단계별 지침을 알려줍니다. 사막 정원을 키울 수있는 좋은 방법입니다.
DIY 지침 및 프로젝트 크레딧 : Succulentsandsunshine
그늘에서 무엇을 자랄 수 있는지 알아보십시오.
 정원에 빛이 부족하여 좌절하십니까? 당신이 심는 모든 것이 시들어 죽거나 단순히 자라기를 거부합니까? 이 문제를 해결하고 그늘에 잘 견디는 15 가지 채소로 그늘진 공간을 최대한 활용하세요. 그들 모두는 하루에 4 시간 이하의 햇빛을 필요로합니다!
DIY 지침 및 프로젝트 크레딧 : Motherearthnews
화분으로 분수를 만드십시오.
 주변 소음을 만들기 위해 정원에 작은 분수대가 있으면 좋지 않을까요? 더 이상 원하지 않는 오래된 화분이 있습니까? 크기가 여러 개 있고 버리고 싶지 않은 경우이 튜토리얼을 사용하여 예쁜 분수로 변환 할 수 있습니다. 필요한 소모품은 매우 적으며 그 결과는 매우 좋고 유지 관리가 쉽습니다. 그리고 그것은 나가서 분수를 사는 것보다 확실히 저렴합니다. 이 프로젝트는 쉽게 사용자 지정할 수 있습니다.
DIY 지침 및 프로젝트 크레딧 : Interiorfrugalista
지속적으로 파를 공급하십시오.
 이 프로젝트에서는 목을 잘라낸 다음 측면에 구멍을 추가하는 플라스틱 병이 필요합니다. 구근이 아직 작을 때 구멍을 통해 양파 구근을 터 뜨리고 병에 흙을 채우고 물을주고 부엌 창문 옆에 두십시오. 전구가 자라서 채소를 생산하기 시작합니다. 채소를 자르면 전구가 더 많이 생산됩니다. 이것은 끝없는 양파를 만드는 방법이 아닙니다. 전구, 그냥 채소.
DIY 지침 및 프로젝트 크레딧 : Dreamgarden101
야채를 보존하기 위해 냉동실을 묻습니다.
 Joyful Home은 농사를 짓고 두껍게 키우고 식료품 가게를 심각하게 줄이는 방법을 배우고 싶다면 흥미로운 블로그입니다! 뿌리 지하실이나 지하실이없는 경우 야채를 보존 할 수있는 훌륭한 대안입니다. Mendy는 그녀와 그녀의 남편이 겨울 동안 감자를 보존하기 위해 오래된 냉동고를 어떻게 묻 었는지 설명합니다. 봄이되자 약간의 싹이 났고 감자는 그대로 남아있었습니다. 정말 멋진 프로젝트입니다!
DIY 지침 및 프로젝트 크레딧 : Joyfulhome
부엌 쓰레기에서 음식을 재배하십시오.
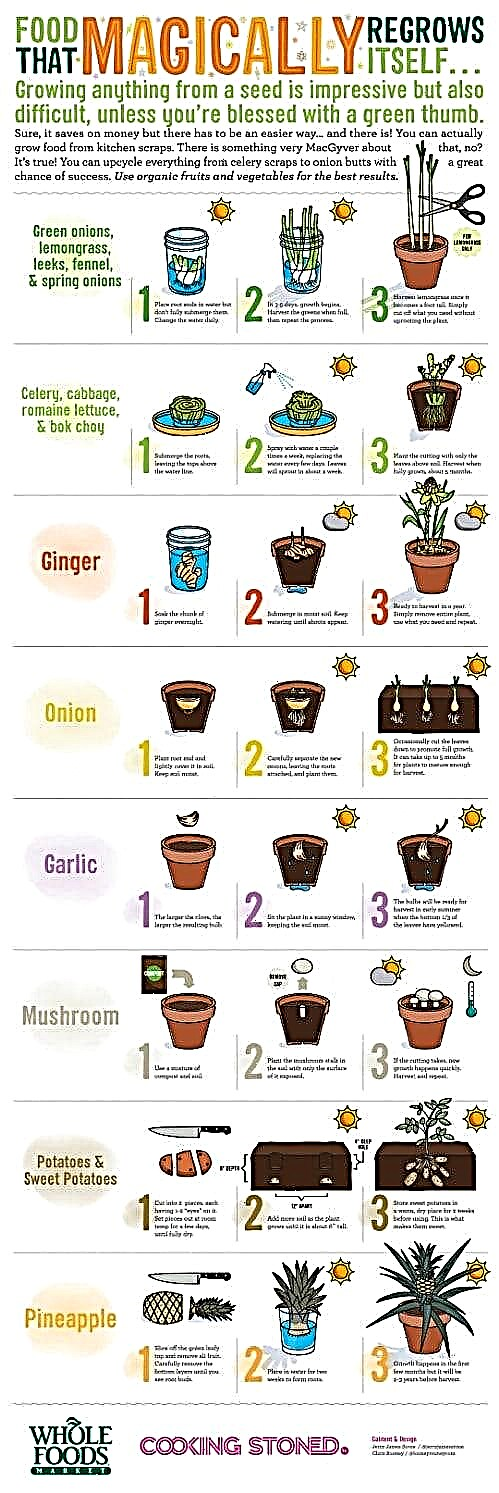 요리 할 때 버리는 채소 찌꺼기 알아? 하지마! 놀랍게도 많은 수의 동물이 실제로 식량으로 다시 자랄 수 있습니다. 물에 넣은 다음 냄비로 옮기거나 처음에는 냄비에 놓습니다. 이 인포 그래픽은 양파, 레몬 그라스, 회향, 부추, 셀러리, 양배추, 생강, 양파, 마늘, 버섯, 감자, 파인애플 등 주방 쓰레기에서 다양한 야채를 재배하는 방법을 알려줍니다. 약간의 작업이 필요하지만 슈퍼마켓 요금을 줄이는 좋은 방법입니다.
DIY 지침 및 프로젝트 크레딧 : Cookingstoned
박쥐를위한 집을 지으십시오.
 박쥐는 절대적으로 매혹적인 생물이며 어떤 곳에서는 멸종 위기에 처한 종입니다. 박쥐 집을 만들어 그들을 도울 수 있습니다. 이 간단한 목공 프로젝트는 기본 도구 만 사용하며 몇 단계 만 거치면 완료됩니다. 최대 300 마리의 박쥐가 집 안에 앉을 수 있습니다 (물론 종에 따라 다름). 박쥐가 자신의 집이나 헛간에서 앉는 것을 막으려는 경우에도 좋습니다. 그들에게 더 나은 대안을 제공하면 대부분이 그것을 위해 갈 것입니다.
DIY 지침 및 프로젝트 크레딧 : Thisoldhouse
목욕 주최자를 화분으로 바꾸십시오.
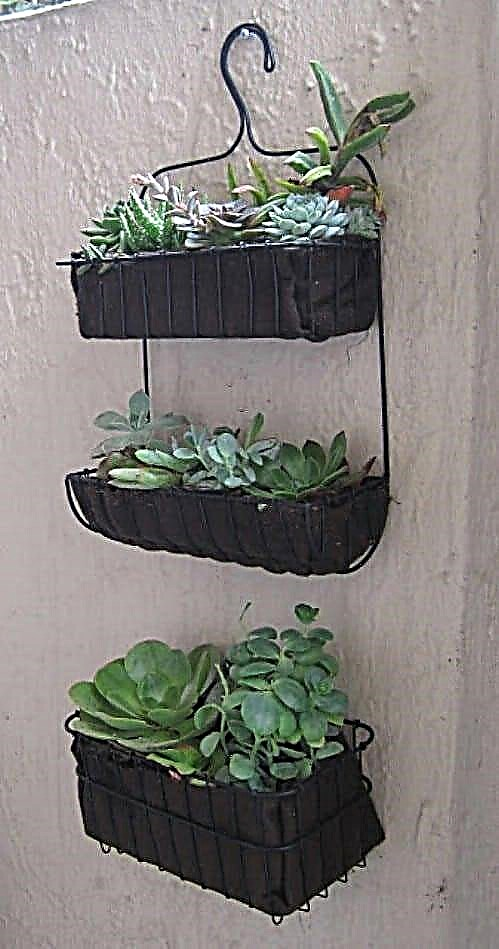 이전에 용도가 변경된 주머니 신발 정리기를 좋아했다면이 아이디어를 좋아할 것입니다. 수건과 비누를 넣을 수있는 욕실 정리 도구를 아십니까? 안뜰 벽에 야외에서 걸고 대신 화분으로 사용하십시오.
DIY 지침 및 프로젝트 크레딧 : Ikeahackers
식물에 생명을 불어 넣으십시오.
 좋아요, 당신은 할 수 없습니다 정말 식물이 죽으면 다시 살아나지만 거의 죽은 식물을 부활시킬 수 있습니다. 갈색으로 보이고 절름발이로 보이는 많은 식물이 실제로 여전히 살아 있습니다. LifeHacker는 죽은 줄기와 잎을 잘라 내고 식물의 햇빛을 약 절반으로 줄이고 가볍게 물을 줄 것을 권장합니다. 아래로 스크롤하여 댓글을 확인하면 죽어가는 식물을 활성화하기위한 다른 좋은 조언도 찾을 수 있습니다.
DIY 지침 및 프로젝트 크레딧 : 원예 노하우
화분에 기저귀를 넣는다.
 … 뭐? 기저귀? 네, 올바르게 읽었습니다. 각 화분의 바닥에 기저귀를 넣어보세요. 왜 그런 짓을 하시나요? 기저귀는 수분을 유지합니다. 그들은 당신의 화분에서 같은 일을 할 것입니다. 화분에 심은 식물이 떨어지는 것을 방지합니다. 이것은 매달린 식물에 특히 유용합니다. 기저귀가 습기를 흡수하기 때문에 평소보다 조금 더 물을 주어야 할 수도 있습니다.
DIY 지침 및 프로젝트 크레딧 : Sandpaperandsillyputty
Earthbox®와 유사한 버킷을 만드십시오.
 If you are familiar with Earthbox®, you know it’s a great system you can use to grow pretty much anything. It’s a great solution if you have a small yard or one with paltry soil conditions. They are expensive, though, and if you are on a budget, it may be better for you to build the equivalent on your own at home! Global Bucket is a low-cost project, fun to make, and very effective for growing a huge range of fruits and vegetables. Click here to watch the how-to video!
DIY 지침 및 프로젝트 크레딧 : Diyncrafts
Grow a living structure.
 This isn’t a how-to, but it is a great list of ideas with some amazing pictures! A lot of them are pretty standard living structures—beautiful arbors and the like, but a couple of them are really unique, like a living chair or a succulent statue. My favorite one is the grass sofa. Since that would essentially involve nothing more than shaping the dirt and planting the grass, it would be easy to create, produce no strain on the plant, and be effortless to maintain. It’s probably pretty comfortable too!
DIY Instructions and Project Credit: Apieceofrainbow
Easy homemade wasp trap.
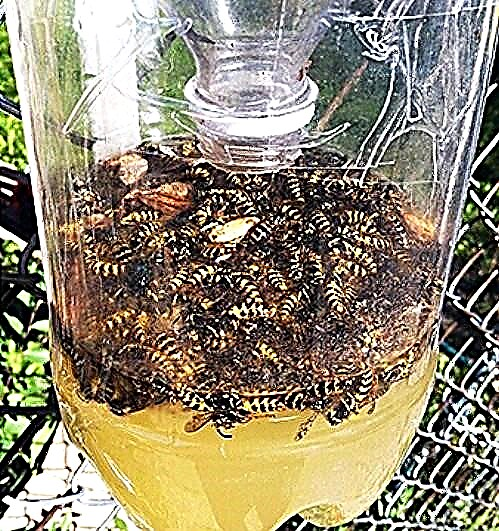 Need to get rid of some pesky wasp buzzing around your home or garden? It’s a good idea to take care of this problem quickly before it turns into a bigger one! This easy home made wasp trap uses a plastic bottle and some sugar water. Judging by the photograph, it’s plenty effective too and will do its job quickly and thoroughly.
DIY Instructions and Project Credit: Apartmenttherapy
Make a watering can out of an old milk jug.
 Looking for an easy way to water your plants, but don’t want to buy a watering can? If you happen to have an old plastic milk jug, all you need to do is heat up a needle and use it to poke a lot of small holes in the lid. Voila, you have a working water can. This is a great way to recycle.
DIY Instructions and Project Credit: Ajourneytoadream
Grow wisteria in a pot.
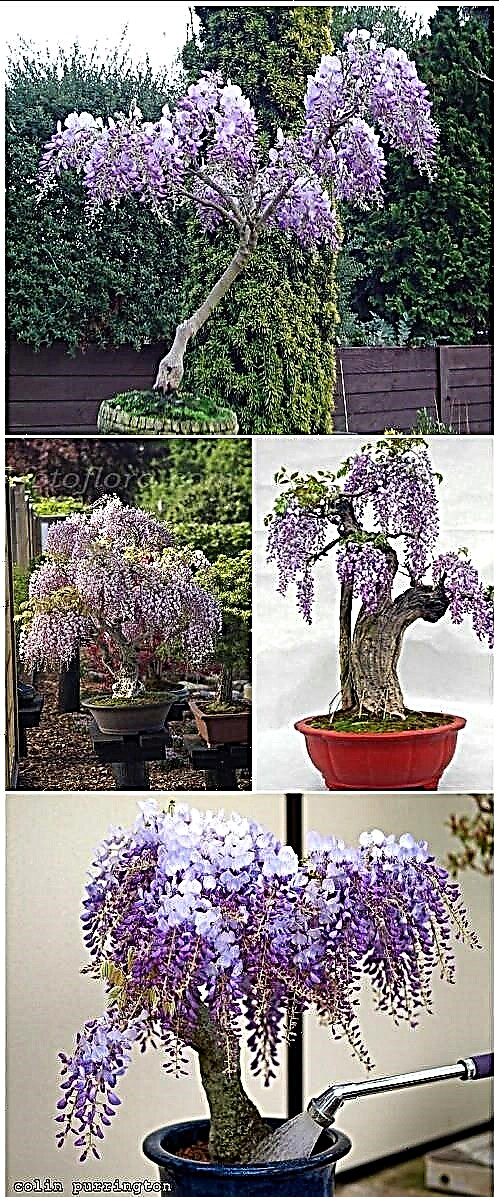 Wisteria is a gorgeous climbing vine that adds beautiful color to a trellis or a wall. Did you know that you can also grow it in a pot? Learn how in ten steps. I actually think these look like little bonsai trees. It looks like a challenging but fun project with beautifully rewarding results.
DIY Instructions and Project Credit: ehow.
Sharpen your old gardening tools.
 Don’t want to throw away your old, dull gardening tools that you’ve had for decades? Well, why should you? With a little sharpening up, they’ll be as good as new, and you’ll be ready to make good use of them again. This post will teach you how.
DIY Instructions and Project Credit: Handy.scout
Turn hydrangeas blue or pink.
 When hydrangeas come in nicely, they are a bold, beautiful color, usually bluish-purplish with a touch of pink. When they don’t come in well though, they are usually a pale, watered down blue with a yellowish tinge—not nearly as impressive. If you want to get your hydrangeas back in all their colorful glory, it turns out it’s just a matter of fixing the pH of your soil. In fact, if you add garden lime, you will turn them pink. If you add soil acidifier, you will turn them blue. There are even products you can purchase to do just that, which makes it super easy! Add the right kind of fertilizer, and you will get the effect you are aiming for.
DIY Instructions and Project Credit: Inmyownstyle
Build a clay pot lighthouse.
 If you love all things nautical, I think you will agree that this is just about the most adorable thing you could do with old clay pots! When I first glanced at it, for a moment I didn’t even realize that what I was looking at was just a few pots stacked one on top of the other—it is very convincing! What an adorable way to light your porch or garden at night and share our love of lighthouses with family and friends.
DIY 지침 및 프로젝트 크레딧 : Diyncrafts
Make a butterfly feeder in 6 easy steps.
 One of the joys of maintaining a garden is the colorful flowers that come into bloom throughout the year—but the flowers are not the only splash of color to be seen in a garden! Butterflies can also make a dazzling display—but only if you are able to attract them. One way you can do that is by making a butterfly feeder from scratch. The only materials required are common ones, and the whole project only takes 6 simple steps. Check it out here.
DIY Instructions and Project Credit: Hometalk
Learn your succulents.
 Succulent plants are amazing. They can thrive in extremely dry, hot conditions, which makes them relatively easy to care for, and the perfect choice if you live in a desert climate. Check out this chart to learn about lots of different types of succulents which can go great in your own garden.
DIY Instructions and Project Credit: Heitonbuckley
Turn a wine bottle holder into a wall planter.
 This project uses the IKEA Vurm, which is a wine bottle holder. Pint glasses turn out to fit perfectly in the rack, and work great for growing herbs indoors. You could also hang this outdoors on a patio. What a fun and easy project!
DIY Instructions and Project Credit: Curbly
Stencil a pattern on an apple.
 Here’s a cool tidbit. If you have red apples growing on the tree which are still green, you can use a sticker to cover up part of the apple, and that part will remain green after the rest turns red. You can then peel the sticker off and you will have a design on the apple. This is a very cute and clever idea which is perfect for growing apples to give as gifts or to sell or use for any creative purpose.
DIY Instructions and Project Credit: Evetichwill German
Repurpose gutters for strawberries.
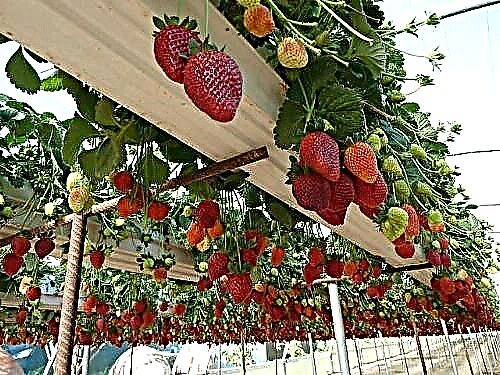 If you want a great way to grow strawberries, try hanging old guttering from welded re-bars. The strawberries grow very nicely from the guttering, and are easy to pick from overhead. There is unfortunately no how-to on this one, but it should not be too challenging to figure it out. Punching some holes underneath would help with drainage.
DIY Instructions and Project Credit: Billyjoesfoodfarm
Make a unique, round garden trellis.
 If you are looking for a fun DIY project that you can build in an afternoon, you will love this idea for making a garden trellis with a unique round shape. The cylinder is just a couple of bike rims, an upright, plus a little garden twine and wire. It is a fast, easy, and fun project with fast results. I would love to see what it looks like once the plants have grown clear up to the top. I bet it has a gorgeous effect!
DIY Instructions and Project Credit: Suitedtotheseasons
Make a cute topsy-turvy stack of gardening pots.
 Check out this super cool stack of planters which seems to defy gravity! At first, looking at this, I was pretty baffled, until I noticed the pole going through the middle. This tutorial will tell you step-by-step what you need and how you can assemble all your supplies to recreate this cool and whimsical effect in your own garden. I imagine that if you grew some draping plants from the pots, you would be able to conceal the pole completely, and the finished look would be even more convincing.
DIY Instructions and Project Credit: Fromdatestodiapers
Make a beautiful tiered herb garden.
 Need a way to save space on a small deck or patio? This tiered herb garden will help you make use of vertical space and free up some room. Frankly, though, even if you had plenty of room to spare on your patio, I think this tiered herb garden would be a terrific project. Just look how gorgeous it is!
DIY Instructions and Project Credit: Decorandthedog
Use glass bottles to edge your garden path.
 Here is a very simple idea that is actually very pretty. Have a bunch of glass bottles lying around, waiting to be recycled? Instead of sending them off to the recycling plant, why not instead use them to edge your garden path? As you can see in the photo, you just push them into the soil upside-down. They probably look even prettier when they catch the light.
DIY Instructions and Project Credit: Thegreenbacksgal
Learn the best tips for growing summer squash.
 Summer squash is very tasty and filling and works great in a lot of recipes. How can you grow the best summer squash with the most success? This blog will teach you the best practices from planting to harvesting so you can enjoy delicious results.
DIY Instructions and Project Credit: Vegetablegardener
Get 48 gardening tips which will help you save money.
 Empress of Dirt is an excellent gardening resource, and this post will provide you with a wealth of amazing ideas for saving money! You will learn how to keep your soil healthy, how to collect rain water and make the best use of it, how to make your own compost, and more. Tips for mulching, planting, and propagation are next. You’ll then learn how you can extend your growing season, repurpose broken junk around your garden for useful and beautiful purposes, and imitate nature for efficiency. You will find so much great information in here. This is a wonderful starting resource for anyone who wants to cut their costs while honing their green thumb!
DIY Instructions and Project Credit: Empressofdirt
Grow your own herbal tea garden.
 Lots of people grow herbs to add to their food in their gardens, but have you ever thought of growing herbal tea? This blog will get you started out right designing your garden and picking herbs. You will also learn tips for harvesting them when they are ready to use as tea. You will learn how to dry them (if that is what you want to do) and store them.
DIY Instructions and Project Credit: Blommi
Create a worm composting bin.
 If you have a plastic storage container and want to learn how to compost at home, this excellent detailed tutorial will teach you all about it. You need about a pound of red worms per two 8-10 gallon plastic totes (you need two totes to make one compost bin). You can mail order the red worms. Why red worms? Earthworms often do not thrive in compost bins, but red worms do.
The blog will teach you the detailed procedure for drilling holes in the compost bin, filling it with the right ingredients, and setting it up in the right spot. You’ll learn what you need to do in order to maintain it and how long to wait before the compost is ready. You’ll also learn what to feed and not feed your compost worms. Very high-quality blog, and an excellent tutorial that could get anyone started on composting!
DIY Instructions and Project Credit: Queenbeecoupons
Build a potting bench.
 Want a nice surface where you can comfortable work on potting your plants? You can assemble this potting bench on your own at home using a couple of pallet boxes. It looks fabulous, and would make for a great workstation!
DIY 지침 및 프로젝트 크레딧 : bhg
Build a real, working greenhouse for just $50.
 Want to put a greenhouse in your backyard, but worried you can’t afford it? Believe it or not, you can purchase all the materials you need to build a fully-functional greenhouse for just $50. That’s if you get the materials used; buy them new and your cost will be closer to $200, which still isn’t bad at all! This is a very detailed tutorial which will teach you all the materials you need, and then provide you with step-by-step assembly instructions, complete with photos. What an impressive project!
DIY Instructions and Project Credit: Doorgarden
Reuse water in your garden.
 If you are looking for a way you can cut back on your water costs, here is one idea. Have some vegetables from your garden you need to rinse? Need to water your garden? Just put a bucket under your colander and rinse your vegetables right there. Instead of letting the water go down the sink drain, you will collect it in the bucket. Then just use it to water your plants. Sometimes the simplest ideas really are the most ingenious ones.
Create concrete hand planters from scratch.
 This is a fun and surprisingly easy project you can do using some really basic supplies. You just need cement for casting, water, a pair of plastic gloves, and a trowel. As you can see, the finished result is both fun and surreal. Scroll down to the bottom and you’ll also find a link to a fun high heel planter tutorial. This lady has a lot of really cool, creative ideas!
DIY Instructions and Project Credit: Diyfunideas
Learn why apple cider vinegar is so awesome to have around in your garden.
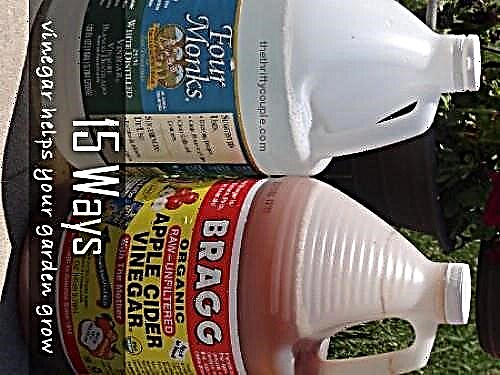 Apple cider vinegar is one of the most handy substances to have around the household. It has literally hundreds of uses, and it turns out that a fair few of them are out in the garden! Apple cider vinegar helps to keep fruit flies away, nourish plants that thrive in acidic conditions, kill mold, get rid of those annoying brown splotches in your grass, and so much more. Discover all the amazing uses here at the Thrifty Couple blog!
DIY Instructions and Project Credit: Thethriftycouple
Discover several great ideas for affordable garden paths.
 If you decide to put a pathway in your garden, you have a bit of an undertaking ahead of you. It can take a great deal of time and work to get a path laid out. But does it have to take a great deal of money? Not if you choose one of these affordable garden path ideas! You will learn the tools needed for all of them as well as the steps for creating each. All of these pathways would be very pretty and cost-effective!
DIY Instructions and Project Credit: Familyhandyman
Up-cycle shoe boxes into seed boxes.
 If you are looking for a nice place to store your seed packets which will help you to keep them organized and easy to access, you can try this project to create a seed box. You just need a large shoebox and some cardboard to start out. You will learn how to create handy dividers with tabs which you can label to help you find specific types of seeds. You can label these with the types of plants, and then you will always know immediately where to look to find what you need, even if you have dozens of seed packets! This project is as thrifty as it is useful!
DIY Instructions and Project Credit: Apieceofrainbow
Make your own hanging macramé candle holders.
 Looking to add a little ambiance to your patio or deck garden after dark? If you have an interest in macramé and want to try your hand at a really simple beginner’s project, these hanging macramé candle holders are for you! You can use them to light your deck or you could string them between trees in your garden. The step-by-step tutorial will teach you how to tie all the right knots with helpful pictures for visual learners. These are really cute and have a nice homespun look to them.
DIY Instructions and Project Credit: Skiptomylou
Create Mason jar solar lights.
 For this project, you will need to actually purchase solar lights, but they are quite inexpensive—you should be able to get them for anywhere from $4-$10 each. You could of course use them as they are, but this project will help you make them pretty! To do that, you need the top of the light, a Mason jar with a relatively wide mouth, some gorilla glue, and a couple of cups of glass gems. The light will shine down into the jar at night and reflect inside the glass gems, making it look like they are glowing. Just think how beautiful it would look if you had a row of these with different colors of glass gems!
DIY Instructions and Project Credit: Myturnforus
Build solar pyramids.
 Speaking of solar, here is a solar project that isn’t for lighting purposes. It doesn’t use solar power to create electricity, but it does harness the power of the sun to help your plants grow in the spring. These solar pyramids were designed by Herrick Kimball of the blog Deliberate Agrarian. In a sense, each solar pyramid functions as a miniature greenhouse. Apparently these pyramids are so good at capturing condensation that you do not have to worry about watering your plants after you get them set up. 와!
DIY Instructions and Project Credit: Thedeliberateagrarian
Build an amazing beehive that won’t disturb the bees.
 If you have an interest in beekeeping, you should check out this very cool design for a beehive. This design is known as the “flow hive,” and was developed by Cedar Anderson and Stuart Anderson. The frames have open cells; this allows the honey to flow out of a pipe for harvest. That means you do not have to pull the frames out yourself. The bees are not disturbed and neither are you. This is both bee-friendly and human-friendly. While there are no instructions for how to do it, there is a video, and if you are industrious and creative, this may give you some great ideas for how you can redesign your own hive.
DIY Instructions and Project Credit: Boingboing
Glass marble fence décor.
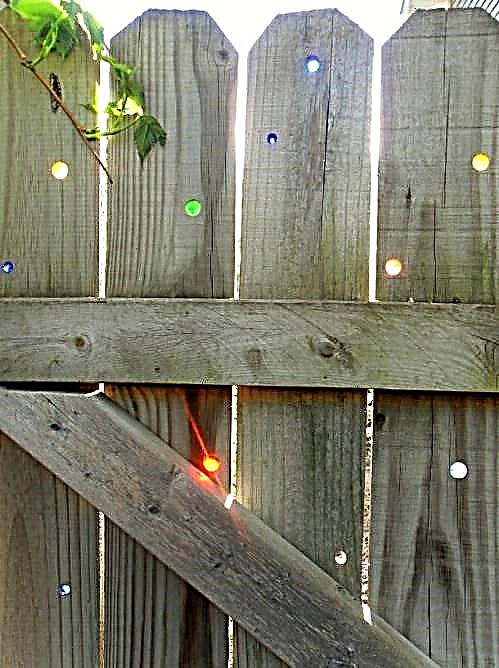 This is such a cute and clever idea for adding some color and pizzazz to your backyard! If you have a wooden fence, just create patterns of holes, as many or as few as you would like, and then push marbles inside. So long as you do a good job with the sizing of the holes, you shouldn’t need any sort of glue to hold them in place. For the best results, go with a west-facing fence. That way when the sun sets, the marbles will all glow with color!
DIY Instructions and Project Credit: Gardendrama
Build a pathway lamppost.
 While this lamppost looks quite sophisticated, it is actually apparently a very easy project which you can complete in a couple of days with some basic supplies. The total cost is around $150. Thanks to This Old House for this one!
DIY Instructions and Project Credit: Thisoldhouse
Grow a sunflower “playhouse” for your kids.
 While it is not obvious from the photograph, this will eventually grow into a sunflower “playhouse.” The round design and the choice of tall plants essentially will turn it into a screened-off “room” in the backyard. This is perfect for children to play in, and makes a great alternative to something like a tree-house if you cannot build one. Your kids will love it so much they will be in it all the time, so as a bonus, you will always know where they are!
DIY Instructions and Project Credit: Rootsandwingsco
Make your planters glow in the dark.
 Why settle for a boring old plastic planter? You can purchase glow-in-the-dark paint and add it to your planters for easy outdoor lighting. When the sun sets each night, they will glow! Imagine a series of these along a garden pathway or lining the edge of a patio or deck. You could use just a splash of glow-in-the-dark color like this, paint the entire planters, or create designs on each one. You can use any colors you choose. This would be a fun project to do with your kids.
DIY Instructions and Project Credit: Hgtvgardens
Turn your old garden tree stumps into something spectacular.
 Old tree stumps don’t have to just sit in your yard taking up space. You can turn them into something magical and beautiful with a few easy steps. This page has several great ideas, including using a garden stump as a natural flowerbed, growing moss on a stump, and turning your tree stump into a base or pedestal for a table or planter. You can even use one to hold a birdbath! These are just a few wonderful ideas. Have a look and you will probably be inspired to come up with even more!
DIY Instructions and Project Credit: Interiorholic
Create a dry creek garden.
 Here is an interesting feature you can add to your garden. It’s low maintenance once you have it set up, and it can give your garden a wilder look. Depending on the stones you choose, you might be able to have it double as a pathway too. Click here to see more photos of dry creek beds you can create along with some helpful tips and tricks.
DIY Instructions and Project Credit: Finegardening.
Recycled tin can lights.
 You can actually purchase these cute lights for your garden. If you have the tools, they might be something you could make from scratch as well. It is certainly a good use to put old tin cans to!
DIY Instructions and Project Credit: Greatgreengoods
Lure in butterflies with this homemade nectar.
 This tutorial will teach you how you can make nectar to attract butterflies to your garden! The nectar itself is really simple; it’s basically just sugar water. You dip the sponge in it and then just hang it from a tree in your garden. This is a great way to draw in butterflies if your flowers alone are not doing the trick.
DIY Instructions and Project Credit: Premeditatedleftovers
Use holiday lights to keep your seedlings warm.
 If you are looking for a way to extend the growing season and keep your seedlings warm during the cooler days and nights of early spring, then don’t put away your holiday lights after Christmas. Instead, add them to your seedling box! They will provide just enough warmth to protect your seedlings, even if you are dealing with freezing temperatures outside. What a clever way to make use of Christmas lights in an unexpected way!
DIY Instructions and Project Credit: Vegetablegardener.
Create seed labels out of canning lids.
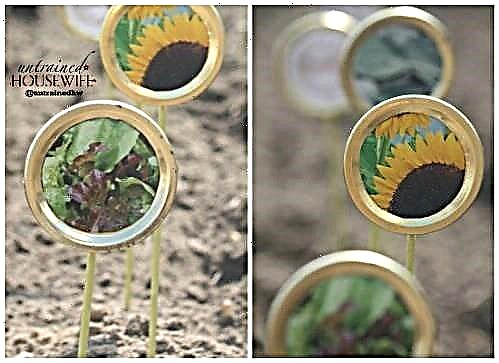 Earlier in the list, I shared a couple of cool ideas for creating seed labels. I really love these canning labels. They look nice and neat, they allow you to recycle, and best of all, you can add images to them and not just words! This is perfect if you are more of a visual thinker. Personally I’d find it much easier to find my way around my seedbed if I labeled like this instead of using words. Each of these little lids is like a window in the future of your garden!
DIY Instructions and Project Credit: Untrainedhousewife.
Learn about vertical gardening.
 If you have limited lawn space, vertical gardening is the best way to use the room you do have available. According to Kathleen Jackson at Starting from Scratch, you need 13 to 18 times more ground space to plant the same amount horizontally that you can plant vertically. If you click through and check out the blog, which I highly recommend you do, you will find detailed instructions to get you started with vertical gardening and saving space.
DIY Instructions and Project Credit: Startingfromscratchchallenge
Easy pest control.
 This milk jug from Walter Reeves has to be one of the easiest pest control ideas I have ever seen. Just coat an empty jug with a bug killer of your choice (try to stick with something organic), and put the milk jug up on a post. Bugs will stick to the container and die. You can wash them off and do it again.
DIY Instructions and Project Credit: Walterreeves
Build a ladybug habitat.
 Then again, sometimes you want to attract bugs to your garden! Ladybugs are big helpers for gardeners, which is why you can order them through the mail if you want. A simple and less expensive alternative is to build a habitat to attract them. Just get a hollow pipe and fill it with bamboo, scrap wood, or something similar. Then place it in your garden somewhere convenient. The ladybugs will love making homes out of the little hollow spaces inside. If you do order ladybugs online, I suggest building this home for them anyway—that way they will want to stay in your garden!
DIY Instructions and Project Credit: Marthastewart
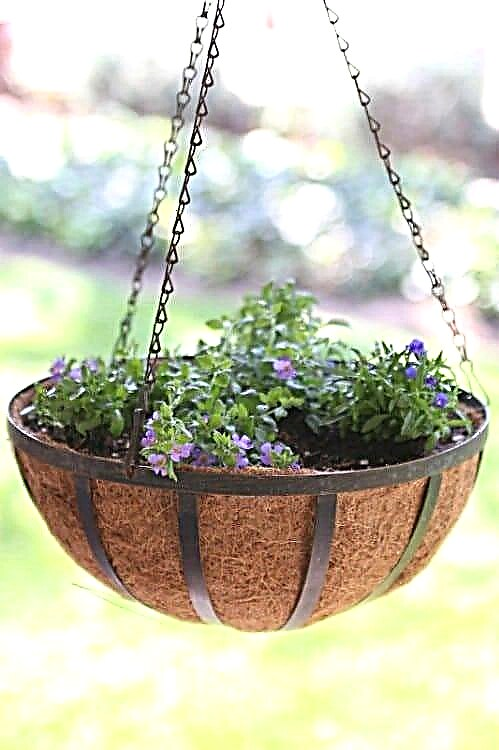
Create a DIY hanging tomato planter.
 Another trick for vertical gardening is to use overhead space. If you have a deck for example or a porch, and you can hang a hook, you can create a hanging tomato planter. While there are no step-by-step instructions, the materials and design look simple enough to replicate.
Source/Image: Cheapvegetablegardener
I hope that you enjoyed all these wonderful DIY garden projects! With these ideas and tutorials, you’ll be able to save money, grow more bountiful fruits, vegetables, and flowers, and enhance your garden with beautiful decorative accents. What are your favorite gardening tips and tricks? Share them with us in the comments below, and if you tried out any of these projects, please share your results!