물건을 부수는 것은 결코 재미가 없으며 종종 시간 전에 무언가를 버리는 것을 의미합니다. 깨진 찻잔, 액자, 가구 또는 쓰레기통에 있다고 생각되는 기타 일반적인 가정 용품이 많이있을 수 있습니다.
반대로, 깨진 아이템으로 할 수있는 다양한 프로젝트가 있으며 쓰레기로 간주 할 수있는 것들로부터 실내외를위한 멋진 장식을 만들 수 있습니다. 우리는 깨진 물건이나 일반 가정 쓰레기를 요구하는 100 가지 프로젝트 목록을 수집했습니다.
용도 변경은 물건을 버리지 않고 집에 약간의 장식 효과를 줄 수있는 좋은 방법입니다. 이 프로젝트는 비교적 쉽고 시간이 거의 걸리지 않으며 무엇보다도 그 쓰레기를 유용한 것으로 완전히 재활용 할 수 있습니다.
깨진 가정 용품을 집어 들고 그것을 다시 살릴 수있는 다양한 방법을 살펴보십시오. 그들이 말하는 것을 알고 있습니다 – 한 소녀의 쓰레기는 다른 소녀의 보물입니다.
깨진 액자를 귀걸이 홀더로 바꾸기
액자에서 유리 잔을 부수거나 (또는 자녀 나 애완 동물이 부러 질 때) 받침대를 버리지 마십시오. 대신, 화려하고 매우 기능적인 귀걸이 디스플레이를 만드는 데 사용하십시오. 귀걸이를 걸려면 일종의 와이어 (그림 와이어가 정말 잘 작동 함)가 필요합니다. 프레임에 와이어를 연결 한 다음 귀걸이를 걸면됩니다. 이것은 모든 연령대의 소녀들에게 훌륭한 선물 아이디어이며 원하는만큼 많은 레벨을 만들면서 많은 와이어를 실행할 수 있습니다. 매달려있는 긴 귀걸이가 있다면 더 긴 레벨을 만드십시오.
DIY 지침 및 프로젝트 크레딧 – Kevinandamanda

부서진 엔터테인먼트 센터에서 플레이 키친 만들기
오래된 엔터테인먼트 센터를 쓰레기장으로 옮기는 대신 몇 시간 동안 어린 소녀를위한 사랑스러운 놀이 주방으로 바꾸십시오. 센터는 필요한 모든 것을 보강 할 수 있으므로 완벽한 상태 일 필요는 없으며 어쨌든 실제로 많은 무게를 지탱할 것으로 예상되지 않습니다. 약간의 페인트와 상상력만으로도 그 오래된 눈빛을 어린 소녀가 몇 시간 동안 즐거움을 얻을 수있는 것으로 바꾸는 데 필요한 전부입니다. 또한 모든 놀이 용 요리 장난감을 보관할 수있는 좋은 장소입니다.
DIY 지침 및 프로젝트 크레딧 – Diynetwork

오래된 바구니로 재활용 센터 만들기
이음새가 갈라지는 것처럼 보이는 다소 큰 바구니가있는 경우 해당 바구니를 훌륭한 재활용 센터로 재활용 할 수 있습니다. 바구니는 실제로 아무것도 담을 필요가 없으므로 바닥의 구멍이 완벽하게 괜찮습니다. 재활용을 위해 바구니 안에 쓰레기 바구니를 넣은 다음 섹션에 라벨을 붙여 모든 것이 어디로 가는지 알 수 있습니다. 이것은 찢어진 바구니를 잘 사용하는 데 도움이 될뿐만 아니라 재활용품을 보관할 수있는 정말 매력적인 장소를 제공합니다.
DIY 지침 및 프로젝트 크레딧 – Bhg

오래된 것들에서 새로운 여름 플립 플롭 만들기
스트랩이 느슨해 져서 함께 보관할 수 없을 때 플립 플롭을 버리는 대신에 모든 새 신발을 만드는 것이 좋습니다. 약간의 천으로 여름에 딱 맞는이 사랑스러운 꼰 플립 플롭을 만들 수 있으며 쓰레기통에 넣을 준비가 된 것처럼 보일 때도 낡은 신발을 보관할 수 있습니다. 구멍이있어 버려야하는 낡은 티셔츠 나 다른 옷으로 꼰 끈을 만들 수도 있습니다.
DIY 지침 및 프로젝트 크레딧 – Makeit-loveit

베이비 로션 병을 휴대폰 충전소로 바꾸십시오.
베이비 로션 병은 비었을 때 쓰레기통에 쌓이는 경향이 있습니다. 결국, 그 빈 병으로 무엇을 할 수 있습니까? 코드가 열려있는 것을 막아주는 정말 편리한 휴대폰 충전 스테이션을 만들 수 있습니다. 약간의 천, 약간의 절단 및 약간의 시간 만 있으면 휴대폰과 코드를 플러그인 바로 옆에 보관할 수있는 정말 편리한 휴대폰 충전 스테이션을 만들 수 있으므로 공간을 절약하고 코드가 눕지 않습니다. 바닥 (애완 동물이있는 경우 부수적으로 나쁜 장소입니다).
DIY 지침 및 프로젝트 크레딧 – Makeit-loveit

오래된 와이어 바구니에서 전등 만들기
낡은 철망 바구니를 쓰레기통으로 보내는 대신, 완전히 닳았더라도 정말 매력적인 전등으로 바꾸십시오. 바구니에 느슨해 지거나 바닥에 구멍이있는 전선이 있더라도이를 사용하여 주방에서 멋지게 보이는 Anthropologie에서 영감을받은 조명기구를 만들 수 있습니다. 바구니를 준비한 다음 펜던트 조명에 연결하기 만하면됩니다. 원하는 경우 부엌 장식에 맞게 미리 페인트 칠하거나 그대로 둘 수 있습니다.
DIY 지침 및 프로젝트 크레딧 – Ashleyannphotography

깨진 화분을 정원 마커로 사용
마모가 좀 더 나쁜 테라코타 화분이 있다면 버릴 필요가 없습니다. 그것들을 사용하여 멋진 정원 마커를 만들 수 있습니다. 깨진 냄비가 하나만있는 경우에도 작동합니다. 몇 조각을 가져다가 매직 마커로 꽃, 허브 또는 채소의 이름을 써서 벗겨지지 않도록하거나 정말 창의적으로 이름을 칠할 수 있습니다 (그 위에 약간의 삽화를 만들 수도 있습니다. ). 심기에 적합하지 않은 오래된 화분이 여러 개 있다면 정원에있는 모든 것에 라벨을 붙이는 데 사용하십시오.
DIY 지침 및 프로젝트 크레딧 – Hardlyhousewives

오래된 옷장을 아늑한 벤치로 바꾸십시오
저는이 가구 화장 프로젝트에 대한 모든 것을 좋아합니다! 지침은 간단하며이 오래된 드레서 중 하나를 저렴하게 구할 수 있다면 반드시해야 할 일입니다!
DIY 지침 및 프로젝트 크레딧 – Grillo Designs

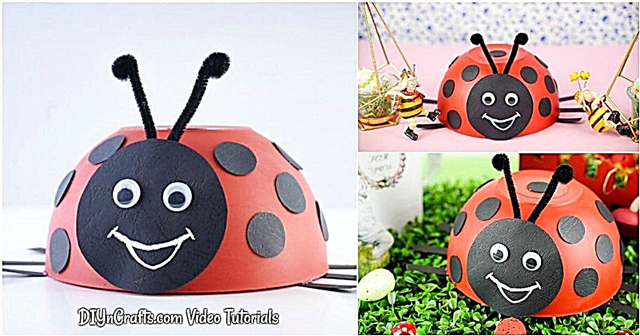
깨진 테라코타를 호박으로
오래된 부서진 테라코타 재배자는 아름다운 호박을 만드는 데 사용할 수 있습니다. 실제로 여러 세라믹으로이 작업을 수행 할 수 있으므로 접시 나 접시가 깨진 경우에도 사용하십시오. 작은 조각을 만든 다음 거품 공에 모자이크 같은 모양을 모아야합니다. 이것은 또한 크리스마스를위한 훌륭한 프로젝트이며 휴일 색상을 사용하여 장식품을 만들 수 있습니다. 그들은 정말 만들기 쉽고 깨진 화분과 접시를 쓰레기통에 버리는 것보다 낫습니다.
DIY 지침 및 프로젝트 크레딧 – Craftsncoffee

금이 간 접시로 예술 작품 만들기
금이 간 접시를 즉시 버리는 대신 부엌이나 식당 벽에 전시 할 수있는 예술품으로 바꾸는 것은 어떨까요? 이것은 실제로 두 개 이상의 조각으로 분할 된 판에 대한 훌륭한 프로젝트입니다. 산산조각이 난다면 다시 붙이고 싶지 않을 것입니다.하지만 큰 조각이 몇 개만 있다면이 방법으로 붙이고 벽을 장식하는 데 사용할 수 있습니다. 깨진 후에도 지울 수없는 오래된 요리를위한 정말 훌륭한 프로젝트입니다.
DIY 지침 및 프로젝트 크레딧 – Homelife

금이 간 화분과 접시로 새 목욕 만들기
금이 간 테라코타 화분과 부서 지거나 금이 간 접시를 사용하여 정원을위한 아름다운 새 목욕탕을 만드세요. 크기가 다른 화분을 사용할 수 있으므로 손상된 화분이 여러 개있는 경우 용도를 변경하는 좋은 방법입니다. (원하는 경우) 페인트를 칠하여 조금 독특하게 만든 다음 조립하면됩니다. 당신은 금이 간 접시와 화분을 더 잘 사용하는 것을 좋아할 것이고 새들도 당신을 사랑할 것입니다.
DIY 지침 및 프로젝트 크레딧 – Patriciaspots

깨진 우산으로 재사용 가능한 가방 만들기
우산 속의 금속이 부러지면 보통 쓰레기통에 들어갈 때입니다. 그러나 이제는 그 우산의 천을 사용하여 정말 깔끔한 접이식 재사용 가능한 가방을 만들 수 있습니다. 약간의 재봉이 필요하지만 전반적으로이 작은 가방을 만드는 것은 정말 쉽고 롤로 접어서 어디를 가든지 가지고 다닐 수 있습니다. 물건을 집으로 옮기기 위해 재사용 가능한 가방이 필요할 때 즉석 쇼핑 여행에 적합합니다. 너무 작아서 지갑에 넣을 수 있고 거기에 있다는 것을 결코 알 수 없습니다.
DIY 지침 및 프로젝트 크레딧 – Untrendylife

깨진 병으로 구슬 만들기
당신은 아마 깨진 병을 정상적으로 버릴 것입니다. 하지만 그럴 필요는 없습니다. 대신이 방법을 사용하여 그 병에서 아름다운 유리 구슬을 만들 수 있습니다. 그런 다음 비즈를 사용하여 보석에서 바람 종소리에 이르기까지 다양한 공예품을 만들 수 있습니다. 이것은 위험한 선박 일 수 있으므로 항상 예방 조치를 취하고 유리 파편으로부터 눈을 보호해야합니다. 그래도 요령을 알 수 있다면 오래된 병으로 만들 수있는 것에 제한이 없습니다.
DIY 지침 및 프로젝트 크레딧 – Instructables

깨진 테이블에서 두 개의 책상 만들기
긁히거나 부러 지거나 손상된 식탁이 있거나 더 이상 필요하지 않은 식탁이 있다면 버리지 마세요. 대신, 그것을 사용하여 집에서 성공할 두 개의 사랑스러운 벽 책상을 만드십시오. 테이블 중앙이 실제로 필요하지 않으므로 중간이 실제로 손상된 테이블에 적합한 프로젝트입니다. 끝 부분을 잘라 내고 페인트하거나 얼룩을 낸 다음 벽에 부착하기 만하면됩니다.
DIY 지침 및 프로젝트 크레딧 – Migonishome

병 뚜껑으로 티 라이트 만들기
좋습니다. 병 뚜껑은 버릴 때 실제로 깨지지는 않지만 어쨌든 용도 변경이 가능합니다. 양초가 많이 필요할 때 (결혼식이나 다른 큰 행사를 생각해보세요) 완벽한 사랑스러운 양초를 만드는 데 사용할 수 있습니다. 병 뚜껑을 청소하고 심지를 추가 한 다음 왁스를 부어 주면됩니다. 왁스는 실제로 녹은 크레용에서 나왔으므로 이것은 두 배의 점수입니다. 당신은 그 병 뚜껑을 쓰레기통에서 꺼낼 수 있고 그 오래된 깨진 크레용으로 할 수있는 일이 있습니다.
DIY 지침 및 프로젝트 크레딧 – Austinweddingblog

깨진 것들로 새 크레용 만들기
부러진 크레용을 던지는 대신 새 무지개 크레용을 만드십시오. 이것은 매우 간단한 프로젝트이며 아이들은이 무지개 크레용을 절대적으로 좋아할 것입니다. 깡통 몇 개, 빈 처방전 병 또는 필름이 들어있는 작은 플라스틱 용기와 깨진 크레용 몇 개가 필요합니다. 기본적으로 깡통에있는 크레용을 녹인 다음 (먼저 철저히 세척해야 함) 굳을 때까지 병에 붓습니다. 크레용은 완벽한 크기이며 깨진 크레용 수에 따라 원하는만큼 다양한 색상으로 만들 수 있습니다.
DIY 지침 및 프로젝트 크레딧 – Momtastic

지상 덮개에 깨진 판 사용
실제 마당에서 깨진 접시를 원하지는 않지만 멀치 대신 사용하여 특정 영역에 약간의 색상을 부여 할 수 있습니다. 예를 들어 나무 주변을 뿌리 덮개 나 자갈로 채우는 대신 깨진 접시 나 테라코타 화분을 사용하십시오. 한 가지 색상으로 모두 처리하여 정말 우아하게 보이게하거나 더 재미 있고 흥미 진진한 모습을 위해 혼합 할 수 있습니다. 뿌리 덮개와 완두콩 자갈보다 훨씬 저렴하며 정원 지역에서 정말 독특한 모습을 보여줄 것입니다.
DIY 지침 및 프로젝트 크레딧 – 아파트 테라피

깨진 접시를 정원 테두리로 사용
깨진 접시와 접시를 정원과 나무 주변의 테두리로 사용할 수 있습니다. 정말 손에 넣을 수없는 오래된 도자기가 있다면 그 접시를 사용하여 정원 구역의 아름다운 테두리를 만드세요. 금이 가거나 부서진 판은 반으로 부수고 (물론 조심스럽게) 반은 단순히 땅에 붙일 수 있습니다. 같은 색상을 사용하거나 약간 혼합 할 수 있습니다. 이것은 당신이 그 접시를 관리하는 데 도움이되고 당신이 좋아하는 야외 공간에 대해 정말 저렴하면서도 아름다운 테두리를 제공합니다.
DIY 지침 및 프로젝트 크레딧 – Wondermom

오래된 책을 예술 책으로 바꾸다
오래된 책 (페이지의 절반이 누락 된 책)이 있다면 버리지 않아도됩니다. 실제로 오래된 하드 커버 책을 사용하여 자녀의 모든 미술 용품을 담은 정말 깔끔하고 기능적인 미술 책을 만들 수 있습니다. 그들은 작은 공간을 차지하고 쉽게 운반 할 수있는 매우 멋진 작은 손잡이가 있기 때문에 여행하기에 좋습니다. 연필이나 크레용 홀더를 만들려면 약간의 천이 필요하고 손잡이와 미술 용품도 필요합니다.
DIY 지침 및 프로젝트 크레딧 – Cosmocricket

깨진 크레용을 멋진 팔 굽혀 펴기로 바꾸십시오
푸쉬 업 크레용은 약간 비싸고 여러 색상을 구입하는 것이 예산에 맞지 않을 수 있습니다. 자신의 크레용 팔 굽혀 펴기를 만드는 것보다 오래된 깨진 크레용을 제거하는 더 좋은 방법은 무엇입니까? 빈 접착제 스틱 용기를 동시에 제거 할 수도 있습니다. 접착제 스틱을 닦은 다음 녹은 크레용을 부어주세요. 그런 다음 아이들은 필요에 따라 크레용을 위아래로 굴릴 수 있습니다. 정말 쉽고 전혀 지저분하지 않기 때문에 아이들이 당신을 도울 수있는 훌륭한 프로젝트입니다.
DIY 지침 및 프로젝트 크레딧 – Infarrantlycreative

깨진 도자기를 디자이너 화분으로 바꾸세요
깨진 접시, 접시, 찻잔 또는 그와 비슷한 것을 사용하여 아름다운 디자이너 화분을 만들 수 있습니다. 모자이크 방법을 사용하여 깨진 조각을 강력한 접착제 또는 모드 포지로 테라코타 화분에 부착하십시오. 이것은 디자인과 패턴을 만들어서 창의성을 뽐낼 수있는 좋은 방법입니다. 화분은 독특하고 아름답 기 때문에 오래된 깨진 접시를 쓰레기장에 보낼 필요가 없습니다.
DIY 지침 및 프로젝트 크레딧 – Allfreecrafts

깨진 지구본에서 조명 만들기
지구본이 이음새에서 분리 되었습니까? 그것이 있고 그것을 다시 붙이고 싶지 않거나 붙일 수 없다면, 대신 이것을 사용하여 정말 독특한 조명을 만듭니다. 아이들의 방에 적합하거나 원하면 부엌에 둘 수도 있습니다. 그들은 동시에 기능적이고 교육적입니다. 조명을 장착하기 전에 내부를 대비되는 색상으로 칠하여 실제로 눈에 띄게 만들거나 자연스러운 색상을 유지할 수 있습니다. 어느 쪽이든이 조명은 대화를 촉발시킬 것입니다.
DIY 지침 및 프로젝트 크레딧 – Instructables

깨진 크레용과 빈 항아리를 다채로운 양초로 바꾸십시오.
빈 병이나 꽃병, 깨진 크레용 몇 개는 보통 쓰레기 더미에 버릴 수 있지만, 그것들을 결합하여 정말 화려한 양초를 만들 수 있습니다. 크레용을 녹여서 색별로 부어주세요. 낡은 메이슨 병에 담아 정말 소박한 느낌의 양초를 만들거나 버리려는 유리 병을 사용할 수 있습니다. 한 쌍을 바구니에 넣고 싶을 때 정말 깔끔한 선물을 만들 수 있고 만드는 데 시간이 거의 걸리지 않습니다.
DIY 지침 및 프로젝트 크레딧 – Notimeforflashcards

깨진 보석을 새로운 조각으로 바꾸십시오
깨진 보석 조각을 모아서 멋진 뱅글과 커프 팔찌를 만들 수 있습니다. 그리 오래 걸리지 않습니다. 깨진 보석과 보석 제작 도구가 있다면 가져 가세요 (없으면 현지 공예품 가게에서 정말 저렴합니다). 자신의 스타일에 맞는 독특하고 매우 창의적인 작품을 만들거나 특별한 것을 만들어 선물로 줄 수 있습니다. 낡은 의상 주얼리가 부서 졌을 때 버릴 필요가 없습니다. 그들과 함께 완전히 새로운 것을 만드십시오.
DIY 지침 및 프로젝트 크레딧 – Hellohydrangea

깨진 보석으로 자석 만들기
오래된 깨진 귀걸이, 목걸이, 팔찌 또는 브로치로 아름다운 자석을 만드십시오. 보석을 자석에 붙인 다음 냉장고 나 게시판을 아름답게 유지하는 데 사용하면됩니다. 큰 조각이 있으면 자석을 만들거나 작은 조각을 모아 패턴을 만든 다음 자석에 붙일 수 있습니다. 뜨거운 접착제는 자석에 보석을 유지하는 데 잘 작동하며 오래된 깨진 의상 보석으로 옷을 입히면 냉장고가 우아하고 멋지게 보입니다.
DIY 지침 및 프로젝트 크레딧 – Livelovediy

깨진 찻잔으로 새 모이통 만들기
부서 지거나 부러진 찻잔과 버리려는 접시가 있다면 대신 새 모이통을 만드십시오. 약 한 시간이면 만들 수 있으며 찻잔이나 머그잔, 받침 접시, 방수 접착제, 피더를 걸거나 걸 수있는 물건 만 있으면됩니다. 새 모양을 추가하면 성공적으로 그 쓰레기를 보물로 바꿨습니다. 당신의 새들은 그들의 새로운 피더를 좋아할 것이고 당신은 마당에 아름다운 찻잔과 접시가있는 단순한 우아함을 좋아할 것입니다.
DIY 지침 및 프로젝트 크레딧 – Blogglebeans

깨진 보석을 캐비닛 손잡이로 바꾸십시오.
깨진 팔찌, 귀걸이 및 목걸이를 사용하여 원하는대로 욕실이나 주방을위한 아름다운 캐비닛 풀을 만들 수 있습니다. 깨진 보석을 가져다가 나사산이있는 기둥에 붙입니다. 현지 철물점에서 약 $ 1 정도의 가격으로 나사가 달린 나사가 달린 포스트 패키지를 가져올 수 있습니다. 에폭시 접착제 또는 이와 유사한 강한 것을 사용하여 보석을 제자리에 고정하십시오. 더 큰 의상 장신구가 가장 잘 작동하거나 작은 조각이있는 경우베이스에 붙인 다음 포스트에 붙일 수 있습니다.
DIY 지침 및 프로젝트 크레딧 – Threescoopsoflove

깨진 CD로 크리스마스 장식품 만들기
CD가 긁히거나 깨지면 더 이상 제대로 작동하지 않습니다. 쓰레기통에 버리는 대신, 다가오는 크리스마스에 나무를 장식 할 수있는 미니 디스코 볼 장식품을 만드는 데 사용하십시오. CD를 부수고 (상대적으로 손상되지 않았다고 가정) 뜨거운 글루건을 사용하여 그 조각을 유리 장식품에 붙입니다. 원한다면 스티로폼 볼로도 시도 할 수 있지만 유리는 훨씬 더 잘 작동합니다. 은색 CD로 투명 유리나 커버 장식을 다양한 색상으로 만들어 정말 화려한 모습을 만들 수 있습니다.
DIY 지침 및 프로젝트 크레딧 – Cremedelacraft

깨진 지구본에서 포푸리 그릇 만들기
어떤 식 으로든 부서진 낡은 구체가있는 경우, 가장 좋은 반을 가져와 포푸리를 표시 할 아름다운 그릇을 만들 수 있습니다. 내부를 칠하면 기발한 서빙 그릇으로 사용할 수도 있습니다. 지구본이 가득 찼을 때 수평을 유지하려면 지구본 바닥에 붙일 둥근 나무 명판이 필요합니다.하지만 지역 공예품 가게에서 아주 적은 비용으로 구입할 수 있습니다. 또는 합판 조각이 있으면 직접 자르십시오. 그런 다음 지구본을 바닥에 반으로 붙이고 큰 그릇을 만드십시오. 지구본의 양쪽 모두 상태가 양호하면 두 그릇을 만들 수 있습니다.
DIY 지침 및 프로젝트 크레딧 – 미리 계획된 잔여 물

부서진 책상에서 스탠드 만들기
부서 지거나 닳았거나 다른 방식으로 손상된 낡은 책상이있는 경우에는 버리지 않아도됩니다. 대신, 그것을 사용하여 어울리는 나이트 스탠드를 만드십시오. 상단이 완전히 수리 할 수없는 경우에도 책상에서 침실 용 탁자를 만든 다음 단순히 모래를 깔고 페인트하여 현재 침실 장식과 일치시킬 수 있습니다. 이것은 양쪽에 동일한 수의 서랍이있는 책상에서 가장 잘 작동합니다. 또는 원할 경우 또는 양쪽에 일치하는 서랍이없는 경우 책상에서 스탠드를 하나만 만들 수 있습니다.
DIY 지침 및 프로젝트 크레딧 – Sugarbeecrafts

부서진 의자에서 프랑스 스타일의 벤치 만들기
오래된 부서진 식탁 의자를 던지는 대신 가져와 멋진 프랑스 풍 벤치를 만드세요. 이것은 깨진 가구에 대한 가장 우아한 프로젝트 중 하나이자 가장 쉬운 프로젝트 중 하나입니다. 같은 스타일의 의자 2 개가 필요하고 벤치 시트 용 나무 "상자"를 만들어야합니다. 그런 다음 기본적으로 원하는 색상을 칠하고 (흰색은 매우 우아하게 보이게 함) 가벼운 쿠션을 추가합니다. 이것은 침대 밑바닥, 출입구 또는 집의 거의 모든 곳을위한 훌륭한 좌석이며 사실상 아무 것도 만들 수 없습니다 (수백 달러에 하나를 사는 것과 비교할 때).
DIY 지침 및 프로젝트 크레딧 – Anoregoncottage

깨진 의자에서 멋진 옷걸이 만들기
부서진 의자의 등받이는 매우 독특하고 멋진 옷걸이를 만드는 데 사용할 수 있습니다. 등받이를 제거 (또는 의자가 완전히 분리 된 경우 들어 올림) 한 다음 옷걸이 하드웨어를 추가하기 만하면됩니다. 옷장을 채우기 위해 많은 양을 만들고 싶지는 않지만 깨진 의자와 관련하여 유용하고 쓰레기를 매립지에서 제거하는 데 도움이됩니다. 또한 멋진 선물을 만들만큼 기발합니다.
DIY 지침 및 프로젝트 크레딧 – Likecool

부서진 의자를 잔디 그네로 바꾸십시오.
다리를 잃은 의자는 식당에서 전혀 쓸모가 없지만 그네로 만들 때 잔디밭에 완벽 할 수 있습니다. 오래된 의자를 가져다가 페인트를 칠하고 하드웨어를 추가 한 다음 현관이나 마당의 큰 나무에 걸 수 있습니다. 이것은 다리가 튼튼하지 않기 때문에 버리는 것을 고려하고있는 식당 의자가 몇 개있는 사람에게 좋은 아이디어입니다. 그것들을 모두 그네로 바꾸고 다른 밝은 색상으로 칠하고 잔디를 장식하십시오.
DIY 지침 및 프로젝트 크레딧 – Thisdiylife

깨진 자전거를 냄비와 팬 랙으로 바꾸십시오.
이 프로젝트에 자전거 전체가 필요하지 않고 바퀴 만 있으면됩니다. 자전거 바퀴는 냄비와 프라이팬을 걸기에 완벽한 크기이며 둥글기 때문에 턴테이블 유형의 선반을 만들 수 있으므로 냄비와 프라이팬을 항상 쉽게 접근 할 수 있습니다. 매달린 하드웨어를 바퀴에 부착하기 만하면 천장에 부착 할 수 있습니다. 그런 다음 냄비와 프라이팬에 후크를 추가하십시오. 이것은 깨진 자전거를 잘 활용하고 부엌에서 약간의 정리를 제공합니다.
DIY 지침 및 프로젝트 크레딧 – Instructables

부서진 자전거에서 유아용 침대 이동
이것은 소리만큼 어렵지 않습니다. 실제로 자전거를 걸지는 않지만 고장난 자전거의 바퀴로 멋진 모빌을 만들 수 있습니다. 원은 실제로 모양에 완벽하고 바퀴의 스포크는 물건을 걸기에 좋습니다. 이것은 또한 행성, 태양 및 달이 순서대로 매달려 있어야 할 때 태양계 프로젝트에 좋은 아이디어가 될 것입니다. 둥근 모양은 모빌이 쉽게 회전 할 수 있도록하며 어린 아이의 관심을 끌고 싶은 모든 것을 추가 할 수 있습니다. 원한다면 오르골을 넣을 수도 있습니다.
DIY 지침 및 프로젝트 크레딧 – Numinationavenue

깨진 세탁기로 불 구덩이 만들기
이 프로젝트에는 실제로 전체 세탁기가 필요하지 않습니다. 내부 드럼 만 있으면됩니다. 뒷마당에 큰 화덕을 짓고 세탁기의 일부가 동시에 덤프에 들어 가지 않도록 할 수 있습니다. 고열 페인트를 사용해야하며 약간의 작업이 필요하지만 생각만큼 많지는 않습니다. 세탁기 드럼은 완벽한 모양을 제공하므로 화덕이 완벽하고 만들기가 정말 쉽습니다. 시원한 밤에 불 옆에 앉아있는 즐거움을 상상해보십시오. 그렇게하는 동안 약간의 쓰레기를 절약 할 수 있습니다.
DIY 지침 및 프로젝트 크레딧 – 아파트 테라피

깨진 옷장을 선반으로 바꾸십시오.
옷장이 파손 된 경우 서랍을 사용하여 멋진지도 선반을 만들 수 있습니다. 다른 것으로 바꾸고있는 옷장이 있고 모든 서랍이 실제로 필요하지 않은 경우에 좋습니다. 서랍 바닥에지도를 추가 한 다음 벽에 걸면 작은 수집품을 보관할 그림자 상자 유형 선반을 만들 수 있습니다. 이것은 매우 쉬운 프로젝트이며 서랍이 완벽한 모양 일 필요가 없으므로 바닥이 떨어지더라도 오래된 옷장을 쓰레기통에 버리지 않고 선반을 만들 수 있습니다.
DIY 지침 및 프로젝트 크레딧 – Olivebites

부러진 사다리를 책장으로 바꾸기
부서진 사다리는 확실히 계속 사용하고 싶은 것이 아닙니다. 더 이상 사용하기에 안전하지 않은 오래된 나무 사다리가 있다면 즉시 버리지 마십시오. 대신, 그것을 분리하고 두 섹션을 일치하는 책장으로 사용하십시오. 오래된 사다리 섹션으로 멋지고 소박한 모습을 만들고 벽에 걸거나 벽에 기대어 앉을 수 있습니다 (물론 견고하다고 가정). 각 사다리 렁에는 책, 수집품 또는 필요한 모든 것이 들어 있습니다.
DIY 지침 및 프로젝트 크레딧 – 거의 측정되지 않음

깨진 세탁기 드럼을 커피 테이블로 바꾸십시오.
인더스트리얼 룩을 좋아하거나 재미 있고 독특한 커피 테이블을 원한다면 고장난 세탁기에서 드럼을 꺼내 테이블로 만드세요. 둥근 유리 조각 (자르고 싶은)으로 상단을 덮은 다음 내부를 사용하여 물건을 저장하거나 작은 그림자 상자 효과를 만들 수 있습니다. 이것에 대한 가능성은 무한합니다. 커피 테이블이 거실을 비추는 데 도움이되도록 내부에 조명을 설치하거나 선호하는 경우 나무 상판을 사용할 수도 있습니다.
DIY 지침 및 프로젝트 크레딧 – Instructables

부서진 가방을 테이블로 바꾸다
부러진 여행 가방 (무거운 빈티지 가방)은 시간을내어 정말 유용한 것으로 바꾸지 않는 한별로 좋지 않을 것입니다. 여행 가방에 다리를 추가하면 거실이나 침대 발에 딱 맞는 멋진 테이블을 만들 수 있습니다. 여행 가방 안에 물건을 보관할 수 있으므로 방을 정리하는 데 적합하며, 그런 유형의 장식을 좋아하는 사람들에게 완벽한 빈티지 느낌이 정말 깔끔합니다.
DIY 지침 및 프로젝트 크레딧 – Designsponge

부서진 피아노를 작업대로 재활용
더 이상 작동하지 않는 오래된 피아노가 있습니까? 매립지로 보낼 생각이라면하지 마십시오. 대신 약간의 저장소와 구성을 만드는 데 사용할 수 있습니다. 오래된 업라이트 피아노는 숨겨진 작업대에 적합한 크기와 모양입니다. 도구 등을위한 공간을 만들기 위해 피아노 내부에서 하드웨어 일부를 제거해야하지만 이것은 차고 나 작업장에 적합하며 나가서 벤치를 사는 것보다 훨씬 저렴합니다. 또한 피아노 벤치는 책과 잡지를 보관하는 데 적합합니다.
DIY 지침 및 프로젝트 크레딧 – Core77

깨진 빈티지 여행 가방을 애완 동물 침대로 바꾸십시오.
쓰레기는 실제로 애완 동물의 보물이 될 수 있습니다. 오래된 깨진 빈티지 여행 가방이 있다면 그 여행 가방에서 작은 개나 고양이를 사랑스러운 침대로 만들 수 있습니다. 기본적으로 윗부분을 제거하고 (어린 털 베이비가 닫히지 않도록) 침대에 스터핑을 추가하면됩니다. 다리를 추가 할 수도 있고 침대가 필요한 애완 동물이 둘 이상인 경우 상단과 하단을 사용하여 2 개의 침대를 만드세요. 이것은 당신의 반려 동물을 기쁘게하고 당신에게 약간의 빈티지 장식을 더해줄 정말 깔끔하고 매우 쉬운 프로젝트입니다.
DIY 지침 및 프로젝트 크레딧 – 혼란스러운 창조

세탁기 드럼을 깔끔한 의자로 바꾸십시오.
고장난 세탁기에서 드럼을 꺼내 먹거리를 추가하면 완벽한 작은 의자가 생깁니다. 롤링 캐스터 다리를 추가하여 좀 더 특별한 것을 제공 할 수도 있습니다. 중앙에 먹거리를 채우거나 중앙에있는 큰 드럼 구멍을 덮을 수있는 윗부분을 만드는 것에 대해 생각할 수 있습니다. 그 위에 스터핑 시트를 추가하고 내부를 보관할 수 있도록 제거 할 수 있습니다. 이것은 아이들에게 좋습니다. 색칠하기 책이나 다른 장난감을 안에 보관할 수 있으며 아이들이 노는 동안 그 위에 앉을 수 있습니다.
DIY 지침 및 프로젝트 크레딧 – Espritcabane

깨진 욕조를 소파로 바꿔
정말? 오래된 집게발 욕조에서 나온 소파? 물론. 이것은 일부 용도 변경 프로젝트보다 조금 더 복잡하지만 오래된 세라믹 또는 철제 욕조에서 아름답고 우아한 소파를 만드는 것은 그만한 가치가 있습니다. 소파를위한 공간을 만들기 위해 앞면을 잘라 내고 속을 채우고 원하는 경우 페인트를 칠합니다. 버릴 생각이있는 오래된 욕조가 있다면 대신이 멋진 소파를 만들어보세요. 침실, 거실 또는 약간의 추가 좌석이 필요한 곳에서 사용할 수 있습니다.
DIY 지침 및 프로젝트 크레딧 – Greenmoxie

깨진은 제품을 식물 마커로 전환
구부러 지거나 부러진 낡은 숟가락과 포크는 버릴 필요가 없습니다. 대신, 손으로 찍힌 식물 마커로 바꾸는 것을 생각하십시오. 이것은 오래된은 제품을 없앨뿐만 아니라 정말 정통하고 소박한 정원 공간을 제공하는 정말 깔끔한 프로젝트입니다. 이 손쉬운 프로세스는 실제로 이름을 금속에 찍어내어 실제로 사용자 지정 마커를 만든 것처럼 보이게하므로 휴지통을 위해 준비된은 제품으로 직접 만들 수 있습니다.
DIY 지침 및 프로젝트 크레딧 – Mossymossy

깨진 옷장에서 아름다운 TV 스탠드 만들기
서랍이 더 이상 제대로 작동하지 않을 때 오래된 옷장을 버리는 대신 우아한 TV 스탠드로 바꾸십시오. 상단 서랍 3 개를 꺼내서 영화, CD 또는 게임 시스템 액세서리를 보관하는 데 다른 서랍을 사용할 수 있습니다. 약간의 샌딩, 페인트 및 몇 시간 만 있으면 돈을 지불 한 것처럼 보이지만 실제로는 몇 달러 만 드는 엔터테인먼트 센터를 만들 수 있습니다. 침실에서도이 작업을 수행하고 원하는 경우 나머지 서랍을 옷장 서랍으로 사용할 수 있습니다.
DIY 지침 및 프로젝트 크레딧 – Domesticsuperhero

깨진 컴퓨터 모니터를 수족관으로 전환
이것은 약간의 작업이 필요하지만 특히 기술을 정말로 즐기는 사람이라면 그만한 가치가 있습니다. 그 모니터를 비우고 쓰레기통에 보내는 대신 멋진 어항을 만들 수 있습니다. 아이들은 컴퓨터 모니터에서 물고기를 절대적으로 좋아할 것이고 상대적으로 작기 때문에 (모니터 크기에 따라 다름) 공간을 거의 차지하지 않습니다. 이것은 구형 모니터 용입니다. 평면 모니터로는이 작업을 할 수 없습니다.
DIY 지침 및 프로젝트 크레딧 – Instructables

부서진 똑바로 우아한 바로 바꾸십시오
더 이상 곡을 연주하지 않는 오래된 업라이트 피아노는 찢어서 버릴 필요가 없습니다. 모든 칵테일 파티의 히트가 될 아름다운 바를 만들 수 있습니다. 실제 연주 부분을 제거한 다음 원하는 색상으로 피아노를 칠하거나 염색해야합니다. 키 아래는 훌륭한 와인 잔 홀더로 바꿀 수 있으며 뒷면의 거울은 더욱 우아하게 만듭니다. 그 오래된 피아노에 경의를 표하는 얼마나 멋진 방법입니까!
DIY 지침 및 프로젝트 크레딧 – Househoneys

깨진 기타로 선반 만들기
더 이상 튜닝 할 수 없거나 어떤 식 으로든 고장난 기타가 있다면 정말 깔끔한 선반으로 바꾸세요. 기타 앞면을 제거하고 (뒤와 목에 더 이상 손상을 입히지 않는 것이 바람직 함) 내부에 선반을 추가하기 만하면됩니다. 음악 애호가의 방 벽에 걸거나 모두가 감상 할 수 있도록 거실에 보관하세요. CD 및 기타 음악 도구를 보관하거나 악보 용 책장으로 사용할 수있는 좋은 장소입니다.
DIY 지침 및 프로젝트 크레딧 – Diybudgetgirl

깨진 유리 잔을 사용하여 식물에 우아함을 부여하십시오
깨진 유리 잔을 버리는 대신 식물에 빛을 비추는 데 사용하십시오. 유리 잔 줄기가 부러지면 화분에 잘 맞습니다. 식물의 흙 속에 붙이고 실제 유리 부분에 양초를 추가하십시오. 이것은 단 몇 초 만에 실내 및 실외 식물 모두에 사용할 수있는 훌륭한 프로젝트입니다. 유리에 자상하지 않도록주의하십시오. 이것은 받침대에 대한 줄기가있는 모든 유리에서 작동합니다.
DIY 지침 및 프로젝트 크레딧 – Dumpaday

깨진 냉장고를 야외 얼음 상자로 바꾸기
냉장고가 망가 져서 교체해야했다면 오래된 냉장고를 쓰레기장으로 옮기는 것이 다음 단계라고 생각할 수 있습니다. 대신 깨진 냉장고를 멋진 야외 얼음 상자로 바꾸십시오. 냉장고를 작동시키는 (또는 파손되기 전에 한) 모든 것을 제거해야합니다. 그런 다음 나무로 덮고 (삼나무가 정말 잘 작동 함) 야외 주방이나 데크에 적합한 얼음 상자를 만드세요. 냉장고의 선반과 바구니를 사용하여 상자 안에 물건을 넣을 수 있습니다.
DIY Instructions and Project Credit – Reddit

Make A Kitchen Utensil Holder From A Broken Rake
When the handle breaks on your rake, don’t automatically trash it. You can use the rake part to create a really neat and rustic looking holder for kitchen utensils. You just have to clean the rake top up a bit to remove any rust and you may want to think about sanding and painting it if it’s really rusty. Then just hang it on the wall and stick your spoons and ladles on it. This is also a great project for holding tools in the garage or tool shed and you don’t really have to clean it up for that.
DIY Instructions and Project Credit – Community

Create A Basket From Broken Blinds
Broken mini blinds normally find their way to the trash can. After all, what could you possibly do with them other than throwing them away? You could actually use them to make a very neat little basket that takes very little time. You just use a weaving method to create the basket and remember to staple together as you go along so that the basket is sturdy. If you have pets that tend to tear up your mini blinds, use them to make baskets instead of tossing them. These baskets are perfect for holding office supplies or just about anything else you can think of.
DIY Instructions and Project Credit – Stephagruss

Make A Wineglass Holder From A Broken Rake
Keep the top of that old rake when it breaks and create a rustic wineglass holder. The sections of the rake top are perfect for holding stemmed glassware and it gives you a great country look. You can simply sand away any rust that may be on the rake and hang it in its natural form or you can paint it with spray paint if you need it to be a specific color to match your kitchen or dining room décor. This is a great project for those old rakes that have broken handles but the tops are still in good condition.
DIY Instructions and Project Credit – Tatteredstyle

Create A Beautiful Chair From Broken China
Instead of throwing out that china when it’s broken, use it to create a stunningly beautiful mosaic chair. This chair is relatively easy to make considering how complicated it looks and it’s a great way to preserve old china that you may simply not want to get rid of even when it’s broken. You just take the broken pieces and put them together on an old chair base in whatever pattern you want. You can use larger pieces or create a smaller mosaic pattern if you have smaller broken pieces.
DIY Instructions and Project Credit – Dishfunctionaldesigns

Build Picture Frames From Broken Mini Blinds
Old mini blinds that are no longer fit to hang aren’t necessarily trash. You can take those blinds and create picture frames in a number of sizes and colors. No matter what material your blinds are made of, you can make beautiful frames for your favorite pictures that are unique and will help you to save money on buying frames for those prints. You just have to measure the pictures that you want to frame so that you have an idea of how many pieces of the blind you need. Then just stack and staple the pieces together to create your frame.
DIY Instructions and Project Credit – Domesticimperfection

Use Chipped Teacups As Curtain Tiebacks
Instead of throwing out those decorative teacups or putting them in the back of a cabinet, use them to create elegant Victorian looking curtain tiebacks. You will need to cut a hole in the bottom for the curtain to come through and then screw a cup hanger into the window frame so that the handle of the cup can be hung. This is a beautiful look and is perfect for formal dining rooms, especially near the china cabinet where you have other dishes in the same pattern sitting.
DIY 지침 및 프로젝트 크레딧 – Bhg

Make A Kindle Cozy From Torn Jeans
If you have old dishes that have seen better days, you can use them to create beautiful lighting for your kitchen or breakfast nook. You need cups and saucers in the same pattern or you could use different patterns and make it really unique and interesting. You will need to attach the lighting and this is better done on a wooden plank so that you can keep all of the cups and saucers straight and even. This is a neat project though and one that really won’t take you long.
DIY Instructions and Project Credit – Punkprojects

Make Lighting From Chipped Cups and Saucers
If you have old dishes that have seen better days, you can use them to create beautiful lighting for your kitchen or breakfast nook. This is a neat project though and one that really won’t take you long.
DIY 지침 및 프로젝트 크레딧 – 아파트 테라피

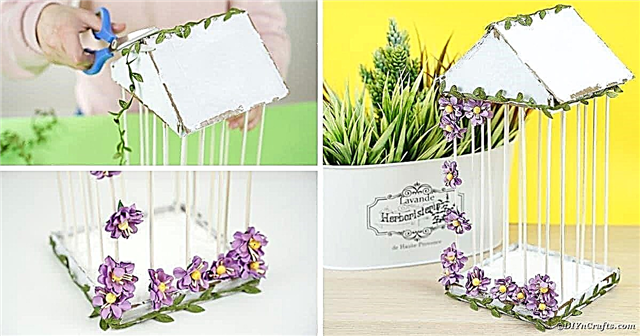
Turn Broken Shutters Into Garden Holders
A broken shutter and some mason jars give you the perfect materials to create a little mini garden for the home or yard. You just have to clean up the shutter, paint if you want and then add the mason jars which are held in place with hot glue. If you are planning to add heavier plants, use clamps. You can cover them up with twine or ribbon. This is great for a kitchen herb garden and keeps you from having to haul those old shutters off to the dump.
DIY 지침 및 프로젝트 크레딧 – Sheknows

Use Broken Records To Make Bookends
Have some old vinyl records that are scratched beyond repair? You can use those records to make really cool bookends, which are perfect for teenager’s bedrooms or family rooms for the musically inclined. There is a really easy method that will allow you to bend the bottom of the records so that they sit flat on a surface. Then you just have to add your books. This is also a great way to organize those records or CDs that you have lying around. Just create the bookends from torn or scratched records and use them to keep good ones in place.
DIY Instructions and Project Credit – Homesessive

Create A Bulletin Board From Broken Mattress Springs
If you have smaller mattress springs (think baby bed mattresses or twin beds) you can use those springs to make really useful bulletin boards. This is actually a really neat project that you can customize however you want. Add a mirror, some shelves or just whatever else you want and then just sit the springs up against the wall near your desk. You can also hang it on the wall with some sturdy hardware which is great if you don’t really have floor space available.
DIY 지침 및 프로젝트 크레딧 – Funkyjunkinteriors

Turn A Broken Door Into A Shelf
After you replace that broken door and before you throw out the old one, consider turning it into a glorious shelf. You can add fabric, batting and even lighting to create a wonderfully unique shelf that is as functional as it is lovely. The door can stand in the corner or up against a wall or you could add hardware to it for hanging. Older doors give you a great rustic look and you can add as many shelves as you need. Plus, the lights help to illuminate your favorite books or collectibles.
DIY Instructions and Project Credit – Bulbtoblossom

Make A Pot Rack From A Screen Door
If you have a broken screen door and you are considering replacing it, keep the old one. You can use that door to make a very roomy and very attractive pot rack for your pots and pans. Just repaint or re-stain the door and then use chains to hang it from the ceiling. You can add hooks to the screen part for hanging pots and pans and keep lids or other items on top so you get loads of organization and all from that broken screen door that you were planning to throw away.
DIY 지침 및 프로젝트 크레딧 – Thekitchn

Turn A Broken Suitcase Into A Medicine Cabinet
Forget throwing that old vintage suitcase away. Even when it’s broken, that suitcase can be used to create a great looking and fully functional medicine cabinet. Just clean out the inside, add some small shelves and you have the makings of a beautiful vintage medicine cabinet that will bring to mind those old traveling medicine men. Add screws to the back to hang it on the wall and if you don’t really need to close the door, you can attach it to the wall open and add shelves on both sides.
DIY Instructions and Project Credit – House-capades

Make Shelves From Torn Books
If you have a few hardcover books that are missing pages or otherwise no longer being read, you can turn them into literal bookshelves. These are really neat and require very little work. In fact, you just have to hang a shelf bracket and then slide the book in. You can create an entire wall of these “book” shelves in just a few minutes and they are great for the bedroom of your favorite bookworm. They also work well in hallways to hold knick-knacks or just anywhere you need them.
DIY 지침 및 프로젝트 크레딧 – Realsimple

Turn A Broken Door Into A Coatrack
Take that old broken door, add a few coat hooks and perhaps some mirrored pieces and you have a beautiful coatrack that is perfect for your entryway or mud room. You can do this with even a small piece of a broken door and then just stain or paint it whatever color you need to match your existing décor. If you have an entire door, you could add shelving or create cubbies to hold shoes and other items in the mud room. This is a great repurpose idea for old doors and for organization as well.
DIY Instructions and Project Credit – Prettyhandygirl

Create Napkins From Torn Denim
If your closet is filled with torn jeans that you are tempted to throw away, think about making a few denim napkins first. You can create beautiful napkins with minimal sewing and these are great for summer cookouts. You basically just fold and sew the denim and you can create pockets for holding silverware. This is an easy project and one that you can work on with different materials so whether you have old jeans in the closet or any other clothing that is ripped or stained, you can make napkins from any of it.
DIY Instructions and Project Credit – Yourpocketstylist

Make A New Aquarium From That Broken Old TV
If you have an old console television that no longer works – or a smaller TV for that matter – you can use the base to create a beautiful new aquarium. You will need to be very careful when removing the electronic pieces of the television and when installing the glass and other aquarium parts. This is a great weekend project and if you do have a console television, you will end up with a great aquarium that sits on the floor. The top of the TV is turned into a lift-off lid so you can feed your fish and tend to the aquarium parts as they need serviced.
DIY 지침 및 프로젝트 크레딧 – 아파트 테라피

Make Mirrors From Broken Rackets
Instead of trashing those tennis rackets when the insides come loose, turn them into sporty mirrors. You simply have to remove the netting from inside the racket and then add a mirror to fit that space. You may need to take the measurements (or the entire racket if it’s easier) to a glass cutter to get a mirror shape that will fit perfectly. Then just attach the mirrors to the rackets and hang them in your little tennis player’s bedroom or anywhere in the house.
DIY 지침 및 프로젝트 크레딧 – Countryliving

Make A Garden Trellis From Broken Tennis Rackets
When you have several tennis rackets that are no longer fit for use (or you could use badminton rackets for this as well) you can turn them into a really nice looking trellis for the garden. This is great for homes with tennis players and it gives you something to do with those rackets instead of simply throwing them away. You just have to gather and group your rackets together, prepare a frame for them and then assemble it. You can paint them all the same color or go with different colors if you want something a bit bolder.
DIY 지침 및 프로젝트 크레딧 – 아파트 테라피

Turn Broken Drums Into Lights
If you have a drummer in the family and you happen to have a broken drum set, you can make gorgeous drum lights. These are great for the bedroom of your rock star or you could use them in a family room or rec room, whatever you prefer. They are relatively easy to make and can be easily hung from the ceiling. The drums work perfectly as lights and are a great touch if you are looking for something a bit out of the norm for your lighting. Plus, it keeps you from adding those drums to your local landfill.
DIY Instructions and Project Credit – Makelyhome

Create Stuffed Animals From Turn Gloves
If your gloves tend to only last one season before they rip or tear, you can make them last a bit longer by turning them into adorable stuffed animals. This is a great project to begin for the Christmas season as these little cuties make wonderful gifts for all the kids on your list. This is also a good project if your gloves have the fingertips missing because you will remove them anyway. You will have to do a bit of hand sewing but the project is really easy overall.
DIY Instructions and Project Credit – Boredpanda

Make Chainmail From Pop Tabs
Okay, so you would probably be throwing out those pop tabs with the cans, right? If you want, you can use those tabs to create a fabulous chainmail purse. It takes a little preparation and cutting to get the tabs ready but once you are done with that, you can simply put them together and create any number of chainmail items. You can do anything from a purse to a costume to picture frames or just about anything else that you can think of to create from your homemade chainmail.
DIY 지침 및 프로젝트 크레딧 – Instructables

Turn Toilet Paper Rolls Into Art
Okay, so they’re not technically broken but empty toilet paper rolls belong in the trash, right? Well, maybe not. You can actually use them to create stunning wall art so if you tend to like recycling, this is the perfect project for you. You can do this in any number of designs and the paint can be in any color that you need. No one but you will know that your elegant art actually began life as a cardboard toilet paper roll and you can help to minimize your trash by not having as many rolls to throw out every week.
DIY Instructions and Project Credit – Cutoutandkeep

Make Birdhouse Stands From Broken Ladders
When your old wooden ladders are no longer safe for you to stand on, you can turn them into beautiful stands for your birdhouses. This works with ladders of all sizes. If they are wooden, just paint them or leave them as they are if you want something a bit aged and rustic looking. You simply have to sit the birdhouses on top of them and you may want to attach them with a screw to keep them secure. You could have these sitting all over your garden area.
DIY 지침 및 프로젝트 크레딧 – Hometalk

Turn A Broken Bed Into A Bench
An old headboard and footboard can be used to make a wonderful corner bench for the little ones. You just have to attach the two together, create the actual seat and then paint or stain the color that you want. Add a cushion and your little ones will adore sitting here to eat or play. You could use this in the dining room or put it outside on the deck if you need extra seating out there. It’s an easy project and a great way to use up those old parts from your broken beds.
DIY 지침 및 프로젝트 크레딧 – Myrepurposedlife

Make A Beautiful Bench From That Broken Dresser
This is a great project for dressers that have several broken drawers. While you may want a couple of the drawers to work properly for use on the bottom, the rest of the dresser is basically removed to create the bench. You can then use the bench at the foot of your bed or even on a deck if you need additional outdoor seating. Paint or stain any color and create something that perfectly matches your existing furniture. This is an easy project that will take you less than a day to complete and keeps you from throwing out that broken dresser.
DIY Instructions and Project Credit – Prakticideas

Create Stunning Jewelry From Broken Clothespins
If you have had your clothespins for long, you may notice that the wood has begun to chip or pull completely apart from the spring. Go ahead and pick up new clothespins but save those old broken ones to create stunning jewelry. This is such an easy project and one that doesn’t require any special tools. Plus, it’s a great gift idea that is not only cheap but allows you to use up those springs instead of tossing them out. You can create pendants, earrings or even charm bracelets with them.
DIY Instructions and Project Credit – Michlinla

Create Pedestal Picture Frames From Broken Materials
Take those broken or mismatched candlesticks and those picture frames that no longer hang or sit upright and create elegant pedestal frames that are perfect for gift giving or keeping all to yourself. Just spray paint the frames and candlesticks the same colors and then glue them together once the paint has dried. These are so very easy to make and are perfect for older frames that no longer want to sit where they should. Plus, you can use those candlesticks that you don’t have any other use for.
DIY Instructions and Project Credit – Fancyfrugallife

Create Storage From Torn Books
While you may balk at the thought of tearing up your old books, if you have any that are already torn then this is a great project. You simply hollow out those hold books and use them to store your belongings. You leave the outside intact so when you add them to your bookshelves, they look like real books. You can use them to store items safely out of view and they are really easy to make. You can do one at a time or create a little nook with several book covers.
DIY Instructions and Project Credit – Sewingbarefoot

Use A Broken Door To Make A Crafting Table
A broken door that you can’t really use on your home any longer is perfect for creating a colorful crafting table that your little ones will love. You just use the door as the top and then place it on cube organizers which work to hold all of your little ones’ craft supplies. Actually, if you made it tall enough this would even work as an adult’s crafting table so it just depends on what you need. You can cover the door with fabric or just paint it the color that you want.
DIY 지침 및 프로젝트 크레딧 – Marthastewart

Make A Lamp From A Broken Shovel
Have a broken shovel that you are planning to throw away? Before you do, take a look at this wonderful shovel lamp. It’s really easy to make and this is perfect for lighting up the pathway outside your garden area. Imagine the pattern that you could create if you had several of these. You could also use them for added lighting in the garage or in a workshop or just put them right there in the kitchen. You can spray paint your shovel whatever color you need so it’s easy to match the lamp to your existing décor.
DIY Instructions and Project Credit – Project-re

Create A Sporty Bag From A Torn Basketball
Basketballs don’t stay up forever. In fact, cheaper ones will begin losing air rather quickly and depending on the size of the hole in them, you may not be able to air them up again. When that time comes, you don’t have to toss them. You can make a fashionable and really cute bag from them that is perfect for any girl who is into sports. Note that you can do this with a volleyball or football as well so this is a great gift idea for your little cheerleader or a sports mom who is really supportive of her players.
DIY Instructions and Project Credit – Project-re

Turn A Torn Shower Curtain Into A Play Mat
When your shower curtain liner gets a hole or when the tops tear and you can’t keep it on the hooks any longer, you can turn it into a wonderful play mat that your children will adore. You can let the kids create roads and cityscapes for their toy cars or use dry erase markers and let them color their favorite pictures over and over again. Dry erase will wipe easily from the plastic liner so this is a great way to keep the kids busy and give them loads of creativity at the same time.
DIY Instructions and Project Credit – Filthwizardry

Keep Buttons From Torn Clothing for Jewelry
When you have a shirt or sweater that is torn or permanently stained, take a minute to remove the buttons before trashing the clothing. You can use those buttons to create beautiful button bracelets that are fun and would make the perfect inexpensive gift for someone special. You just cut a piece of elastic in the size you need, sew the ends together rather tightly and then sew on the buttons. You can create any number of designs and patterns and each bracelet can be completely unique.
DIY Instructions and Project Credit – Lillyella

Use Broken Dishes And Silverware To Make Wind Chimes
Have some broken china that you can’t bring yourself to part with? Or, perhaps you have some vintage silverware that can no longer be used for eating but you just hate to throw it out. Use those pieces to make beautiful wind chimes that you can hang from your porch. This lets you keep those dishes that you don’t really want to throw away and they make a beautiful sound when the wind blows. You could also use broken costume jewelry as accents if you have any on hand so this is a great project for using up a lot of your broken household items.
DIY Instructions and Project Credit – Songbirdblog

Turn A Broken Chandelier Into A Serving Tray
A broken chandelier (one that no longer works as opposed to one that is actually broken into pieces) makes a beautiful dessert tray. You will need to remove all of the hardware for the lighting from the base and each individual light. Then simply attach china plates to the places where the lights used to hand and use those plates for serving up your favorite desserts. This is a great project for upcoming weddings or is perfect for the Holidays when you want an elegant dessert tray. Broken costume jewelry like faux pearl strands are great for embellishing the tray.
DIY Instructions and Project Credit – Dreaming-n-color

Make Rag Rugs From Torn Clothing
Those old t-shirts that are no longer wearable and just about any other clothing that you may have that is ripped or torn can be used to make wonderful rag rugs. This is also a great project for torn sheets and even curtains in certain fabrics. You can use different clothing materials and colors to create a multi-colored rug or use sheets and old blankets in the same colors for something a bit more elegant. These rugs are perfect for the kitchen in front of the sink or you could use them in the bathroom as bath mats.
DIY Instructions and Project Credit – Littlehouseliving

Use Knobs From Broken Doors For Patio Flooring
Before you throw those old doorknobs away, even if the doors are completely useless, you can turn the knobs into beautiful flooring for your outdoor patio. Actually, you can also use those old burners from your stovetop that no longer work and other items around the house that are broken or otherwise trashcan bound. The different finishes will give your patio a great look and the pieces are very stable when you set them in soil and surround them with your favorite outdoor plants.
DIY 지침 및 프로젝트 크레딧 – 일몰

Turn Doorknobs Into Wine Corks
When your doors are broken and in need of repair, keep the doorknobs and use them to create these beautiful and very unique wine corks. All you need are the decorative doorknobs and some cork, which you can buy at any craft or hardware store. You could also just use the cork that comes in your wine bottles if you wanted. This works best with old knobs that have screws in them or you could use old cabinet pulls if they are decorative enough. You simply have to push the screw into the cork by turning and get ready because this could take a bit of time. The end result however, is well worth the effort.
DIY Instructions and Project Credit – Brokegirlsguide

Empty Tin Cans Make Great Hairbrush Holders
While tins cans aren’t really broken, they are useless once you get the food out, right? Instead of adding them to your trash heap, use those cans to make wonderful holders for your hairbrushes. You just have to remove both ends of the cans, clean them very well with warm soapy water and then cover them with Washi tape, paint, wallpaper or just about anything else you want. Fabric works very well and hot glue does a good job of holding your cover in place. Then attach them with screws to the inside of your vanity door and you have a great place for storing and organizing brushes.
DIY Instructions and Project Credit – Thecreativeimperative

Turn Broken Picture Frames Into Decorative Molding
If you love the look of picture frame molding but aren’t really a fan of the cost, you can make your own with those old broken picture frames. If you have frames that have lost their backing or their glass has been broken, you just remove all of that, paint them the color that you want your molding to be and then hang them on the wall. You can use frames that are all the same size or create a pattern from frames of different sizes. This is a great look and one that seems expensive. Only you will know that you have salvaged trash to create it.
DIY 지침 및 프로젝트 크레딧 – Bobvila

Make A Jewelry Holder From Broken Spindles
When stair spindles are broken, they may seem useless. You can however, repurpose them into gorgeous jewelry holders that are unique and very creative. You just have to paint them, add a base and then use them to keep your necklaces and bracelets from getting tangled. If you are looking for a unique gift idea and one that won’t cost a fortune, this is a good one. The best part is you make it from something that you were probably just going to throw away. You could also use an old drawer pull or broken costume jewelry to decorate it.
DIY Instructions and Project Credit – Sublime-living

Use Bent and Broken Silverware For Drawer Pulls
Instead of throwing out that old silverware when it bends or breaks, use it to make cabinet door handles instead. This is actually a really popular look and one that may cost a bit if you went out and bought all of those handles. Instead, you can make your own with silverware that you were planning to toss. If you have silverware that is tarnished beyond repair, simply clean it up a bit and paint it if you want to create rustic looking handles that look much more expensive than they are.
DIY Instructions and Project Credit – Whiteleycreek

Make Good Use Of A Broken Binder
When binders break, they are normally trash. After all, they’re really not that expensive and most people simply throw them out without considering what could be done with them. If you cut away the actual cover part, you can use the binder as a key holder. Just attach it to any wall with screws, which will fit nicely into the holes already in it, and then use it to hold keys or put it outside on the deck to hold grilling utensils, towels by the pool or anything else you need. You can paint it if you want or even mount a few of these onto a wooden base.
DIY Instructions and Project Credit – Upcycleus

Create A Stunning Table From A Broken Piano
There really isn’t a lot that you can do with an old piano when it stops working. You can however, create beautiful shadowbox type tables and depending on the size of your piano, you may be able to make two of these for the living room. You use the keys on the inside of the table to give it a really neat musical look and then cover with glass that you can have cut at your local hardware store or glass cutter. These are beautiful and help to somewhat preserve the look of the piano so you don’t really have to throw it all away. You can keep the best parts.
DIY Instructions and Project Credit – Trash2treasure

Turn Leaky Buckets Into Outdoor Serving Items
Those old leaky buckets are useless when it comes to holding liquid but they will serve as holders for your outdoor eating very nicely. You just take some time to give the bucket whatever look you want and then use it for holding silverware, napkins or other solid items when you eat out. Give it a great patriotic look and use it for your 4th of July table outside. It doesn’t take very long to create something great out of an otherwise useless bucket.
DIY 지침 및 프로젝트 크레딧 – Hometalk

Make Soap Dispensers From Glass Bottles
If you tend to buy things in glass bottles (like certain bottled waters or wines for instance), you don’t have to necessarily chuck the bottles when they are empty. You can use them to make soap dispensers that are gorgeous and really functional. You will need to get some pumps which you can buy at a craft store or you could just preserve the pump from lotions if you want. Then just clean up and even decorate the bottles with broken jewelry, mosaics made from broken china or anything you want and fill with your favorite liquid soaps.
DIY Instructions and Project Credit – Theredchairblog

Make Coasters From Old Wine Corks
Instead of throwing out the corks when you are finished with the wine, use them to create great coasters. This is a great project for corks that no longer serve their purpose because they don’t need to be in perfect shape to make coasters. The coasters have a great beach-y look to them and they are easy to put together. You need a hot glue gun to attach them to each other and then just tie them off with ribbon or twine, whatever your preference. These are absolutely adorable and such a wonderful way to reuse those old corks.
DIY Instructions and Project Credit – Thefrugalnavywife

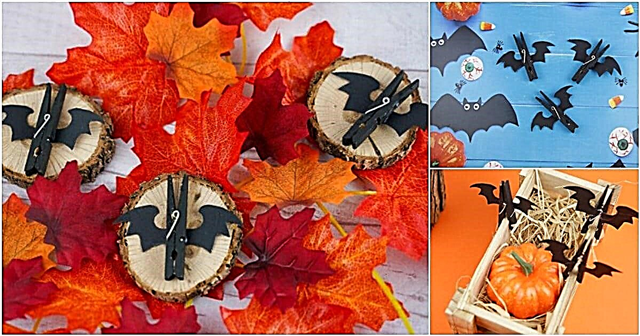
Make Monsters From Bread Clips
Once the bread is gone, you normally throw out the clips, right? Some people do use them for other things and if you are one of those people, this is a great Halloween project for you. You can turn those clips into adorable monsters that you hang on DIY garland to decorate for the holiday. Just paint monster faces on your bread clips and this works with clips of all sizes, even the ones that may be broken or chipped. Once you have your monster faces done, just clip them all onto a rope or string for hanging.
DIY Instructions and Project Credit – Craftyladylindsay

Create Berry Basket Snowflakes
Okay, so normally you would throw out those plastic berry baskets, especially if they’re broken. Before you do however, take a look at the beautiful snowflakes that you can create with them. This works well even with baskets that are broken or ripped. You really just need the bottom of the basket and it’s ok if the bottom is a bit worse for wear as well. Just create the snowflake shape and then glue and dip in glitter. These are great for hanging outdoors for the Holidays or you could even use them to decorate the tree.
DIY 지침 및 프로젝트 크레딧 – Alphamom