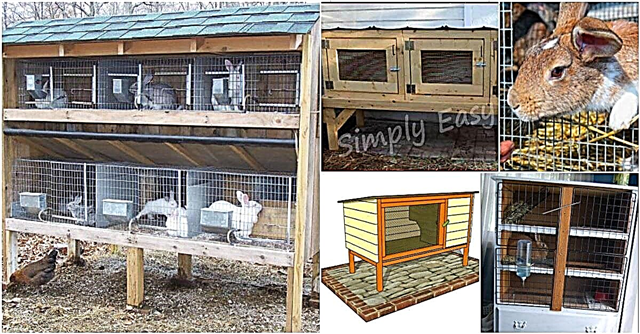
삼베는 매우 인기있는 재료이며 많은 공예 가능성을 제공합니다. 집에 약간의 시골 풍을 더하고 싶거나 단순히 삼베 모양을 좋아한다면 만들 수있는 것들이 너무 많습니다!
 삼베로 만들 수있는 쉬운 DIY 프로젝트 100 개를 모았습니다. 침대 스커트와 커튼부터 베개, 액자, 심지어 결혼식 복장까지 쉽게 삼베 공예품을 모아 집을 꾸미거나 선물로 줄 수 있습니다.
삼베는 찾기 쉽고 상대적으로 저렴하거나 (감자 자루를 생각해보십시오) 현지 공예품 점에서 구입할 수 있으며 요즘에도 다양한 색상으로 나오므로 일반적으로 갈색을 좋아하지 않더라도 공예품을 완성하기 위해 다른 색상을 찾을 수 있습니다. 삼베를 잡고이 놀라운 프로젝트 중 하나를 시작하십시오.
펠트 플라워 삼베 베개
이 작은 베개는 거실이나 침실에 소박한 매력을 더할 수있는 완벽한 방법입니다. 소파에 놓거나 장식용 침대 베개로 사용하든 관계없이 사랑스럽고 만들기가 정말 간단합니다. 펠트 플라워는 가장 복잡한 부분이지만 그것도 비교적 쉽습니다. 베개를 만들기 위해 충분한 삼베가 필요합니다. 이것은 너무 쉬워서 소파에 여러 개를 만들고 특정 요구에 맞게 크기를 변경할 수 있습니다.
DIY 지침 – Bet1975
삼베 캔버스
이것은 사진이나 메모를 보관하기에 완벽한 훌륭한 프로젝트입니다. 주방에 걸고 빨래 집게를 사용하여 일정이나 중요한 이벤트에 대한 메모를 할 수 있습니다. 캔버스를 구입해야합니다. 캔버스는 현지 달러 스토어에서 구할 수 있으며 사진이나 메모 카드를 보관할 수있는 옷핀을 고정하려면 리본이나 기타 패브릭 트림이 필요합니다. 실제로이 모든 것을 한 시간 이내에 모을 수 있으며 조리법이나 원하는 것을 담는 데 좋습니다.
DIY 지침 – Akadesign
쉐비 로즈와 삼베 토트
너무 많은 토트 백을 가질 수는 없으며 이것은 측면의 사랑스러운 초라한 장미까지 완전히 삼베로 만들어졌습니다. 실제로 원하는 곳에 장미를 놓을 수 있지만 스트랩 바로 옆에 멋지게 보입니다. 삼베에서 완전히 원하지 않는 한 안쪽을 덮을 천이 필요합니다. 약간의 재봉이 필요하지만 하수도를 시작하는 경우에도 시간을 너무 많이 차지하지 않고 이번 여름 해변에서 사용할 수있는 아름다운 토트 백을 제공하는 아주 작은 프로젝트입니다.
DIY 지침 – Lamaisonreid
삼베 및 레이스 테이블 러너
가을 테이블을 꾸미는이 얼마나 아름다운 방법! 이 레이스 및 삼베 테이블 러너는 아름답고 쉽게 만들 수 있습니다. 다른 계절에도 사용할 수 있지만 가을 저녁 식사와 추수 감사절에도 완벽 할 것입니다. 아주 간단한 프로젝트이기도합니다. 삼베를 자르고 레이스를 추가하기 만하면됩니다. 더 넓은 레이스를 추가하여 더 넓게 만들거나 얇은 레이스 테두리를 추가하여 더 작게 만들 수 있습니다. 특정 테이블 길이에 맞게 길이를 전환 할 수도 있으며 커피 테이블이나 옷장에도 적합합니다.
DIY 지침 – 축하 행사
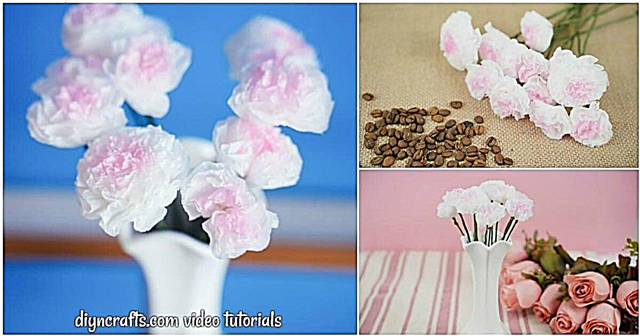
소박한 삼베 꽃병
이 아름다운 꽃병은 실제로 업 사이클 된 깡통으로 만들어졌습니다. 캔을 철저히 닦은 다음 삼베를 끝까지 붙입니다. 삼베를 잘라서 길이가 완벽하게 맞는지 확인한 다음 멋진 새틴이나 레이스 리본으로 마무리해야합니다. 토퍼를 코바늘로 뜨개질하고 리본을 통과시킬 수도 있습니다. 이것들은 결혼식에 꽃을 테이블에 올려 놓거나 이번 여름에 아름다운 야생화를 들고 집 주위에 앉아있을 수 있습니다. 약간의 뜨거운 접착제는 삼베와 리본을 제자리에 완벽하게 고정합니다.
사용 가능 : Etsy Burlap 소박한 꽃병
삼베 커튼
이 사랑스러운 삼베 커튼을 걸면 집이 가질 소박한 모습을 상상해보십시오. 침실, 거실 또는 식당에서 원하는 것을 원하는대로 빠르게 만들 수 있으며 재봉 할 필요가 없습니다. 그들은 매장에서 구입 한 커튼보다 훨씬 저렴한 패널 당 약 $ 7의 비용이 들며 훨씬 더 독특합니다. 원한다면 다른 것들로 조금 꾸미거나 아무것도 추가하지 않고도 멋지게 보일 수 있습니다.
DIY 지침 – Fourgenerationsoneroof
삼베 백업으로 소박한 슬라이딩 칠판
이것은 가족 메시지를 정리하는 데 완벽한 훌륭한 Pottery Barn 모조품입니다. 메시지를 쓸 수있는 칠판과 메모, 조리법 또는 편리하게 보관해야하는 기타 항목을 고정 할 수있는 삼베가 있습니다. Pottery Barn (더 이상 사용할 수 없음)의 원래 작품은 $ 100 이상 이었지만 프로젝트를 위해 가지고있는 것에 따라 약 $ 10에 직접 만들 수 있습니다.
DIY 지침 – Prettyhandygirl
삼베 크리스마스 스타킹
우리는 크리스마스 프로젝트가 조금 이르다는 것을 알고 있지만이 프로젝트는 너무 귀여워서 언급해야했습니다. 다가오는 휴일에 소박한 모습으로 꾸미고 싶다면이 삼베 스타킹은 절대적으로 완벽합니다. 측정하고, 자르고, 바느질 한 다음 원하는대로 장식하세요. 밑단이없는 주름 장식은 사랑스럽고 소박한 시골 느낌을줍니다. 벽난로에 필요한만큼 이러한 작업을 수행하거나 현관 장식에 추가하는 것을 상상할 수 있습니다.
DIY 지침 – Dearlillieblog
러플 베드 스커트
이 멋진 침대 스커트는 주름 장식이 많고 집에 진정한 소박한 느낌을 더하려는 사람들에게 삼베에 완벽합니다. 치마는 실제로보기보다 만들기가 훨씬 쉬우 며 지침에 따라 킹 또는 퀸 사이즈로 만들 수 있습니다. 풀 사이즈 또는 트윈 사이즈의 침대 스커트가 필요한 경우 잘라도 좋습니다. 모서리의 작은 활은 정말 귀엽고 침대에 삼베 장식 베개 몇 개가 있으면 어떻게 보일지 상상해보십시오.
사용 가능 : Etsy Ruffled Bed Skirt
지울 수있는 저녁 메뉴
이 메뉴는 확실히 당신의 부엌을 꾸미고 아주 편리한 작은 기능을 제공합니다. 일주일 동안 만들 계획 인 모든 식사를 추적 할 수 있습니다. 이를 통해 필요한 모든 것을 준비하고 모든 저녁 식사를 완벽하게 정리할 수 있습니다. 프로젝트 자체는 정말 쉽고 원하는 색 구성표를 사용하여 주방 장식과 완벽하게 일치시킬 수 있습니다. 이것들은 또한 훌륭한 선물이 될 것입니다.
DIY 지침 – Bystephanielynn
도자기 헛간에서 영감을 얻은 프렌치 베개
이 화려한 모노그램 베개는 모든 침실에 적합하며 아름다운 삼베 꽃 부케와 함께 제공됩니다. 이미 삼베와 속을 손에 들고 있다면이 제품은 비용이 들지 않을 것입니다. 이것은 모노그램으로 거의 $ 50를 실행할 수있는 Pottery Barn 버전보다 훨씬 저렴합니다. 원하는 경우 침대 또는 소파를 꾸미기 위해 더 작은 버전으로도 할 수 있으며 완료하는 데 시간이 거의 걸리지 않습니다.
DIY 지침 – Confessionsofaplateaddict
삼베 샤워 커튼
삼베 샤워 커튼과 사랑스러운 옷걸이를 모두 만들 수 있습니다. 이 작은 프로젝트는 직물 접착제와 다리미를 사용하여 모든 것을 제자리에 유지합니다. 커튼 후크 사이의 빨래 집게는 멋진 터치이며 전체 욕실을 정말 소박하고 구식으로 보입니다. 이것은 어떤 욕실 에나 잘 어울리고 모든 것을 완성하는 데 약 5 야드의 삼베 만 필요하므로, 특히 이미 몇 야드의 삼베를 손에 들고있는 경우에는 정말 쉽고 정말 저렴합니다.
DIY 지침 – Halfbakedhomemaking
Anthropologie에서 영감을 얻은 황마 허리케인 랜턴
이 위대한 Anthropologie 모조 허리케인 랜턴을 약간의 삼베, 약간의 정원 꼬기 및 황마 로프 및 몇 가지 다른 공급품으로 만들 수 있습니다. 양식을 만들려면 용기가 필요하지만 오래된 아이 스티 갤런을 재활용 할 수 있으므로 다른 용품이 있으면이 제품은 1 센트가 들지 않습니다. 이것들은 야외 장식에 좋고 만들기가 정말 쉽습니다. 당신은 그들 중 몇 가지를 할 수 있고 이번 여름에 멋지게 갑판에서 정말로 즐겁게 할 수 있습니다.
DIY 지침 – 찬송가
삼베 화환
이 사랑스러운 삼베 화환을 만들고 다른 장식을 만들 수 있으므로 일년 내내 매달아두고 각 계절에 맞게 조금만 변경할 수 있습니다. 화환 자체는 만드는 데 시간이 거의 걸리지 않으며 소모품이 거의 필요하지 않습니다. 삼베 재료를 화환 형태에 적용하거나 원하는 경우 와이어로 만든 다음 원하는 장식을 추가 할 수 있습니다. 화환이 얼마나 꽉 찼는 지에 따라 몇 야드의 삼베가 필요하며 꽃선을 사용하여 나무 글자 또는 기타 장식을 추가 할 수 있습니다.
DIY 지침 – Theturquoisehome
삼베 직물 재배자
이 작은 화분은 만들기 쉽고 아름다운 봄 꽃을 장식하는 완벽한 방법입니다. 코코 섬유 라이너에 꽃을 심은 후에는 모든 것을 삼베로 "포장"하고 리본이나 활을 추가하기 만하면됩니다. 당신은 이것들을 바닥에 직접 앉히거나 당신의 연석 매력을 조금이라도 꾸미고 싶다면 현관에 보관할 수 있습니다. 그것들 중 여러 개를 그룹화하면 쉽게 할 수 있고 아름답게 보입니다.
DIY 지침 – Themotherhuddle
No-Sew Burlap Valance
이 훌륭한 밸런스는 정말 비싸고 우아해 보이지만 약 한 시간 만에 만들 수 있으며 만드는 데 비용이 거의 들지 않습니다. 기본적으로 창문을 측정하고 삼베를 자른 다음 창문에 걸어두면됩니다. 압정을 사용하여 제자리에 고정하면 삼베가 압정을 완벽하게 숨겨서 보이지 않게합니다. 닳은 가장자리는 바닥에서 멋지게 보이며 원하는대로 밸런스를 높이고 싶은 곳에 넥타이를 배치해야합니다.
DIY 지침 – 11magnolialane
삼베 게시판
이 훌륭한 삼베 게시판은 매우 쉽고 저렴하게 만들 수 있습니다. 코르크 보드 만 있으면됩니다. 현지 달러 스토어에서 아주 적은 비용으로 구입할 수 있습니다. 스테이플 건, 실내 장식용 압정 몇 개, 삼베 한 마당. 일반 코르크 보드를 삼베로 덮은 다음 장식용 압정을 사용하여 약간의 장식을 제공합니다. 이것은 주방에 적합하며 조립하는 데 시간이 거의 걸리지 않습니다. 요리법, 청구서 또는 원하는 것을 여기에 고정하고 중요한 작업을 스타일로 기억하십시오.
DIY 지침 – Tidymom
화이트 삼베 토끼
부활절을위한 정말 독특한 프로젝트를 찾고 있든 아니면 토끼를 절대적으로 좋아하든,이 쉬운 삼베 토끼 프로젝트를 좋아하실 것입니다. 이 작업을 실제로 흰색으로 할 필요는 없습니다. 천연 삼베 (또는 다른 색상)를 선호하는 경우 원하는 색상을 사용할 수 있습니다. 삼베에서 토끼 모양을 잘라내어 손으로 꿰매고 닫기 전에 채우는 것을 잊지 마십시오. 이것들은 수제 부활절 바구니 또는 기발하고 정말 귀여운 장식을 원하는 곳 어디에서나 좋습니다.
DIY 지침 – Cottageatthecrossroads
Anthropologie Inspired Ruffled Lampshade
이 아름다운 주름진 전등갓을 만들려면 약 1 야드 반 정도의 삼베 만 있으면됩니다. 집안의 어느 방에서도 완벽하게 어울립니다. 이미 가지고있는 오래된 램프베이스를 사용하거나 지역 중고품 상점이나 야드 세일에서 1 달러 또는 2 달러에 하나를 선택할 수 있습니다. 그런 다음 원하는 색상으로 기본을 칠하고 Anthropologie에서 영감을 얻은 그늘에서 작업하십시오. 이걸 꿰매 지 않아도 돼요 패브릭 접착제를 사용하여 프릴을 함께 유지하여 아름답고 쉽게 만들 수 있습니다.
DIY 지침 – Tatertotsandjello
삼베 호박
가을까지 기다리지 말고이 사랑스러운 삼베 호박을 만들기 시작하세요. 다양한 크기로 할 수 있습니다. 이것들은 내부 또는 외부를 장식하는 가을에 좋습니다. 그것들을 만들기 위해 약간의 재봉이 필요하지만 보이는 것보다 훨씬 쉬우 며 정말 화려하고 대담한 디스플레이를 만들고 싶다면 다른 색상으로 할 수 있습니다. 삼베를 호박으로 만들기 전에 샤피 나 다른 마커로 약간 장식하여 정말 독특한 디스플레이를 만들 수도 있습니다.
DIY 지침 – 새로 고침-갱신
삼베기구 홀더
이 작은 식기 홀더는 추수 감사절 식탁을 꾸미기에 완벽한 물건입니다. 물론 추수 감사절까지 기다리지 않고 사용하고 싶지 않다면 여름 모임에도 좋습니다. 만들기가 매우 간단하고 바느질을 할 필요가 없습니다. 뜨거운 아교 총과 함께 붙여서 장식품이나 이름표 또는 장식하고 싶은 것을 추가 할 수 있습니다. 꼬기의 작은 조각은 저녁 식사 손님과 공유하고 싶은 이름이나 특별한 메시지를 추가하는 데 적합합니다.
DIY 지침 – Iheartnaptime
삼베 포장 꽃병
삼베 조각, 일반 유리 꽃병 및 작은 레이스 만 있으면 결혼식이나 집안 어디에서나 멋진 삼베 포장 꽃병을 만드는 데 도움이됩니다. 흰색 페인트로 꽃병에 이미지 나 단어를 쉽게 스텐실 한 다음 흰색 레이스를 사용하여 함께 묶을 수 있습니다. 이 프로젝트를 통해 꽃병을 덮고 와인 병을 재활용하거나 꽃병으로 바꾸고 싶은 거의 모든 것을 재활용 할 수 있습니다. 빠르고 쉬우 며 비용도 거의 들지 않습니다. 삼베와 기타 소모품이 조금 있으면 전혀 없습니다.
DIY 지침 – 매력적
DIY 삼베 깃발
이 깃발은 집에 조금 독특한 것을 걸고 싶거나 야외 깃발로도 사용할 수 있다면 훌륭한 프로젝트입니다. 삼베를 필요한 크기로 자르고 스텐실로 원하는 메시지 나 이미지를 추가 한 다음 황마 로프를 추가하여 깃발을 걸기 만하면됩니다. 이 전체 프로젝트는 1 시간도 채 걸리지 않으며 (물론 사용하려는 메시지와 단어를 적용하는 방법에 따라 다름) 삼베 조각과 페인트가 있으면 비용이 들지 않습니다.
DIY 지침 – Thewoodgraincottage
삼베 컵 케이크 포장지
삼베 줄이있는 컵 케이크는 결혼식이나 맛있는 컵 케이크에 특별한 것을 추가하고 싶을 때 좋은 아이디어입니다. 삼베를 테마로 한 결혼식을 계획하고 있다면 웨딩 케이크 옆에 멋지게 보일 것입니다. 삼베를 컵 케이크 포장지 템플릿에 붙인 다음 컵 케이크를 그 안에 내려 놓기 만하면됩니다. 단순한 황마 또는 꼬기 넥타이가 중간을 통해 멋지게 보이지만 원하는 모든 유형의 장식을 추가 할 수 있습니다.
삼베 캔들 홀더
이 작은 촛대는 가을 장식에 적합하지만 다른 계절에도 멋지게 보일 것입니다. 유리 캔들 홀더 (또는 유리 용기)를 덮기 위해 삼베를 자르고 원하는대로 장식하기 만하면됩니다. 도토리는 앞쪽 중앙에서 멋지게 보이지만 장식에 상상력을 사용할 수 있습니다. 항아리 주위에 삼베를 감싸고 제자리에 붙인 다음 앞쪽에 꼬기 리본을 추가하여 정말 멋지게 만듭니다.
DIY 지침 – Victoriabrikho
삼베 코스터
삼베 컵 받침은 내부 또는 외부에 좋습니다. 이것들을 사용하여 여름 야외 저녁 파티를 꾸미거나 내부에 보관하여 액체가 나무 표면에 묻지 않도록 할 수 있습니다. 가장 큰 부분은 만들기가 정말 쉽다는 것입니다. 손에 삼베 천이 약간만 있으면 비용이 전혀 들지 않습니다. 컵 받침의 기초를 만들기 위해 어떤 종류의 재료로 된 사각형이 필요하며 삼베를 추가하고 원하는대로 장식하십시오. 페인팅이 잘 작동하며 삼베에 직접 칠할 수 있습니다.
DIY 지침 – Alyssaandcarla
귀걸이 디스플레이
이 멋진 귀걸이 디스플레이는 삼베로 만들어져 액자에 담겨 있습니다. 정말 쉽게 만들 수 있고 사진 액자를 한 장당 약 1 달러에 구입할 수 있으므로 매우 저렴합니다. 프레임의 매트에 삼베를 스테이플 링 한 다음 원하는 색상으로 프레임을 페인트하면됩니다. 낚싯 바늘로 잠긴 귀걸이는 삼베에 바로 들어가고 여기에 다른 유형의 귀걸이도 넣을 수 있습니다. 시간을내어 조금만 맞춤 설정하면 무엇을해야할지 아는 것보다 더 많은 귀걸이를 가진 사람에게 멋진 선물이 될 것입니다.
DIY 지침 – Cucicucicoo
삼베 덮힌 주방 의자
삼베로 덮어 오래된 주방 의자를 멋지게 꾸며보세요. 리업 홀스터 링에 대한 경험이 많지 않더라도 상당히 쉬운 프로젝트입니다. 삼베를 자른 다음 좌석 공간에 부착하여 오래된 천을 덮거나 오래된 조각을 먼저 제거하면됩니다. 필요한 경우 더 많은 패딩을 추가하여 의자를 훨씬 더 편안하게 만들 수도 있습니다. 특히 삼베로 된 부엌 의자를 모두 복구하려는 경우 훌륭한 주말 프로젝트입니다. 의자 하나에 2 시간 이상 걸리지 않습니다.
DIY 지침 – Boyohboyohboycrafts
Pocketed Burlap Corkboard
은폐하고 싶은 낡은 코르크 판이 있든 달러 스토어에서 골라 내고 싶든 (각각 1 달러 정도) 이것은 일반 메모 보드를 약간 향상시키는 훌륭한 프로젝트입니다. 삼베는 특정 영역에서 접혀 있으므로 거기에 넣어야하는 모든 사진이나 편지를 완벽하게 담을 수 있습니다. 압정을 사용하여 물건을 보관할 수도 있으므로 정리를 유지하는 데 도움이되며 작은 주머니는 이동 중에도 매우 편리합니다.
DIY 지침 – Uncommondesignsonline
바느질 삼베 향 주머니 없음
향 주머니는 옷장 서랍에 추가하고 옷 냄새를 멋지게 유지하는 데 좋습니다. 이 작은 삼베 주머니는 신선한 라벤더로 채워져 있으며 바느질이 전혀 필요하지 않습니다. 서랍이나 벽장에 아주 좋거나 만들어서 선물로 줄 수도 있습니다. 삼베로 주머니를 만들고 라벤더를 넣은 다음 함께 붙이거나 묶습니다. 원하는 경우 약간 장식하거나 외부에 라벤더를 남겨 둘 수 있습니다.
DIY 지침 – Onsuttonplace
러플 삼베 식탁보
이 아름다운 식탁보에는 약 12 야드의 삼베와 몇 야드의 모슬린 천이 밑에 있습니다. 낭만적 인 저녁 식사에 완벽하거나 항상 식당 테이블에서 멋지게 보일 수있는 사랑스러운 주름 장식이 있습니다. 원하는 경우 레이스 또는 다른 장식 재료를 추가 할 수도 있지만 실제로는 그대로 보입니다. 꿰매어야하는데 야외 식탁에서 얼마나 멋질까요? 또는 휴일에도 사용할 수 있습니다.
DIY 지침 – Celebratingeverydaylife
삼베 버니 백
보라색 토끼로 완성 된 귀여운 작은 토트 백 (또는 원하는 색상으로 할 수 있음)이 이번 부활절에 멋지게 보일 것입니다. 이스터 에그 사냥에 사용하거나 원하는 경우 지갑으로 휴대 할 수 있습니다. 비교적 쉽게 만들 수있는 가방이며 토끼에 귀여운면 꼬리를 추가하여 정말 귀엽게 만들 수도 있습니다. 이 프로젝트는 이미 만들어진 삼베 가방을 필요로하지만 쉽게 직접 만들 수 있고 다른 색상의 삼베로 만들어 선물로 나눠 줄 수도 있습니다.
DIY 지침 – Thecasualcraftlete
삼베 배너
올 가을 (또는 봄, 여름 또는 겨울)을 쉽게 만들 수있는 아름다운 삼베 배너로 장식하세요. 배너의 조각을 잘라 내고 말하고 싶은 내용을 스텐실 한 다음 각 조각에 황 마나 꼬기를 붙여서 함께 고정하고 매달기만하면됩니다. 이것은 크리스마스 또는 추수 감사절 배너로 정말 좋을 것입니다. 또는 토끼 나 추가하고 싶은 다른 것이있는 부활절 배너로 쉽게 바꿀 수 있습니다.
DIY 지침 – Iheartnaptime
쉬운 야외 삼베 깔개
삼베, 아크릴 페인트, 스텐실 및 아크릴 코킹으로 여름을 즐겁게 보낼 수있는 정말 멋진 야외 깔개를 만드십시오. 코크는 삼베의 가장자리가 풀리는 것을 방지하고 양탄자에 몸을주는 데 도움이됩니다. 원하는 모든 디자인을 할 수 있으며 자연이 야외 장식과 잘 어울리지 않으면 다른 색상의 삼베를 집을 수 있습니다. 이것은 아름다운 깔개이며 만드는 데 시간이 거의 걸리지 않습니다. 데크 또는 파티오에 추가하고 야외 장식에 활기를 불어 넣으십시오.
DIY 지침 – 아파트 요법
삼베 커피 백 커튼
삼베로 만든 낡은 커피 백은 인터넷에서 쉽게 찾을 수 있으며, 한 쌍만 있으면 주방용으로 사랑스러운 커피 백 밸런스를 만들 수 있습니다. 프로젝트의 요지는 정말 쉽습니다. 삼베의 크기가 올바른지 확인하기 위해 창문을 측정 한 다음 커튼 봉에 밸런스를 매는 옷걸이를 만들어야합니다. 바느질도 할 필요가 없습니다. 원하는 경우 패브릭 접착제를 사용할 수 있으며 고리는 클립으로 부착 할 수 있습니다.
DIY 지침 – Debbie-debbiedoos
소박한 삼베 오토만
다시 덮개를 씌워야하는 오래된 오토만이 있다면 삼베로하지 않는 이유는 무엇입니까? 이것은 거의 모든 거실 장식과 일치하는 멋진 모습이며 실제로 생각보다 훨씬 쉽습니다. 오토만에서 천을 제거한 다음 그것을 덮을 수있는 충분한 삼베로 교체하고 측면에 약간의 추가를 추가하면됩니다. 오래된 오토만이 없다면 마당이나 가까운 중고품 가게에서 꽤 싸게 구할 수 있습니다.
DIY 지침 – Lizmarieblog 
삼베 세탁 표시
이 삼베 표지판은 세탁실에서 멋지게 보일 것이고 만들기가 너무 쉬워서 하루도 안되어 끝낼 수 있습니다. 걸기위한 프레임이 필요하며 삼베에 직접 말하는 귀여운 작은 세탁물도 인쇄해야합니다. 믿거 나 말거나 삼베에 인쇄하는 것은 정말 쉽고 일반 프린터로 할 수 있습니다. 이 간단한 트릭을 배우면 모든 종류의 것을 삼베에 인쇄하고 싶을 것입니다. 인쇄가 끝나면 속담을 틀어 세탁실에 걸어 두세요.
DIY 지침 – 국내 사용
삼베 리본 나무
크리스마스를 장식하든 아니면 커피 테이블을 장식하기 위해 정말 독특한 것을 원하든,이 삼베 리본 나무는 완벽하고 만들기가 완벽합니다. 거품 원뿔을 사용하거나 포스터 보드에서 원뿔을 만든 다음 리본이 달린 삼베를 감싸십시오. 봄과 여름에 다른 색상으로 할 수도 있고, 휴일을 위해 고전적인 녹색과 빨간색으로 유지할 수 있습니다. 유선 삼베 리본은 매우 잘 작동하며 제자리에 잘 고정됩니다. 또한 다양한 색상으로 얻을 수 있습니다.
DIY 지침 – Thegirlcreative
아름다운 삼베 크리스마스 천사
이제는 크리스마스를위한 독특한 장식을 시작할 때입니다.이 삼베 천사는 소박한 모습을 좋아한다면 필수품입니다. 이것들은 또한 멋진 선물이 될 것이며 정말 쉽게 할 수 있습니다. 날개에는 유선 삼베 리본이 사용되며 필요한 기타 소모품도 몇 가지 있습니다. 그것들은 정말 저렴하게 만들 수 있고, 완전히 독특한 스타일을 만들 수 있도록 다양한 방법으로 장식 할 수 있습니다.
DIY 지침 – Uncommondesignsonline
파란색 삼베 냅킨 링
이 냅킨 링은 낭만적 인 저녁 식사, 결혼식 또는 특별한 것을 원할 때 언제든지 우아하고 완벽합니다. 실제로 삼베로 냅킨 링을 만들 수있는 몇 가지 다른 방법이 있으며 모두 비교적 쉽습니다. 구슬 모양이 마음에 들면 삼베를 자르고 구슬을 추가 한 다음 끝을 함께 꿰매어 반지를 만들 수 있습니다. 재봉은 아마 직물 접착제보다 더 잘 작동하지만 손으로 재봉 할 수 있으므로 기계가 필요하지 않습니다.
DIY 지침 – Fabyoubliss
국가 삼베 장식품
아이들은 삼베로 사랑스러운 시골 크리스마스 장식품을 만드는 데 도움을 줄 것입니다. 이 아름다운 창조물로 완전히 장식 된 크리스마스 트리를 상상해보십시오. 그들은 쉽게 만들 수 있으며 몇 야드의 삼베 재료에서 여러 개를 얻을 수 있습니다. 반짝이, 스텐실 및 기타 장식품을 사용하여 약간 장식하거나 원하는대로 평범하게 둘 수 있습니다. 재봉 할 필요가 없습니다. 대신 천 접착제를 사용한 다음 리본, 꼬기 또는 기타 끈을 붙이기 만하면 나무에 붙입니다.
DIY 지침 – Ttrinketsinbloom
삼베 토피어리
이 사랑스러운 삼베 장식물을 다양한 크기로 만들 수 있으므로 실내 및 실외에 적합합니다. 현관 문 밖에 서기 위해 다소 큰 몇 개를 만들거나 더 작은 것을 만들어 아름다운 중앙 장식품이나 테이블 디스플레이를 만들 수 있습니다. 봄에 사용하기 위해 정말 화려한 화분에 추가하거나 가을과 겨울에 장식하기 위해 흰색으로 둘 수 있습니다. 이것들은 훌륭합니다. 그들은 만들기 쉽고 장식 측면에서 사랑스러운 장식으로 많은 것을 할 수 있습니다.
DIY 지침 – Designdininganddiapers
스텐실 삼베 플레이스 매트
이 쉬운 DIY 플레이스 매트로 테이블을 멋지게 꾸며보세요. 필요한 삼베를 적절한 크기로 자르고 가장자리와 다리미에 천 접착제를 추가하면됩니다. 이렇게하면 닳는 것을 방지하고 원하는대로 스텐실을 만들 수 있습니다. 가족 저녁 식사를 위해 각 가족 구성원의 이름으로 하나를 만들거나 휴일을위한 특별한 메시지를 만들 수 있습니다. 이것들은 시간과 천이 거의 걸리지 않아서 몇 야드의 삼베에서 몇 개를 얻을 수 있기 때문에 훌륭합니다. 그리고 재봉이 필요 없어 정말 만들기 쉽습니다.
DIY 지침 – 가정용
부활절 바구니 벽걸이
삼베에 매달려있는이 사랑스러운 부활절 바구니 벽을 만들 충분한 시간이 있습니다. 특정 공예품을 만들 때 구부리고 비틀기 쉽고 잘 붙는 유선 삼베 리본을 사용할 수 있습니다. 바구니를 만든 후에는 인형, 토끼 또는 추가하고 싶은 다른 것으로 장식하기 만하면됩니다. 이 프로젝트는 정말 사랑스럽고 너무 쉬워서 믿기지 않을 것입니다. 이것을 사용하여 문을 장식하고 부활절 장식을 건너 뛰고 여름 내내 매달리고 싶다면 봄 색상을 사용할 수 있습니다.
DIY 지침 – Trendytree
삼베 눈사람 벽걸이
약 한 시간 정도면 크리스마스 장식에 딱 맞는이 3D 눈사람 벽걸이를 만들거나 선물로 만들 수 있습니다. 프레임에 삼베를 붙이고 눈사람을 칠하면됩니다. 시간이 거의 걸리지 않으며 삼베를 사용할 수 있고 작은 프레임이 몇 개 있으면 이것에 아무것도 쓸 필요가 없습니다. 원하는 경우 다른 캐릭터로 만들 수 있으므로 크리스마스 공예를 시작할 준비가되지 않은 경우 여름 캐릭터 또는 부활절 토끼를 만들 수 있습니다.
DIY 지침 – Howtothisandthat
바스켓 위브 삼베 테이블 러너
이 테이블 러너는 정말 복잡해 보이지만 매우 쉬운 프로젝트입니다. 보이는 것보다 훨씬 더 간단한 바구니 짜기 효과를 만들 수 있어야합니다. 진행하면서 완벽하게 제자리에 머물 수 있도록 각 조각을 접착제로 붙이십시오. 이것은 식당 테이블을위한 훌륭한 주자이거나 커피 테이블, 옷장 또는 원하는 곳 어디에서나 다양한 크기로 만들 수 있습니다. doilies를 대체하기 위해 더 작은 사각형 버전을 만드십시오.
DIY 지침 – Taradennis
삼베 액자
이 아름다운 삼베 프레임은 만들기가 매우 쉽고 나무가 필요하지 않습니다. 운이 좋은 것처럼 보이는 멋진 프레임을 만들기 위해 판지를 삼베로 덮기 만하면됩니다. 이것들은 당신이 아는 모든 사람에게 멋진 선물이 될 것이며 하루에 여러 가지를 할 수있을 정도로 만들기가 매우 쉽습니다. 바느질도 할 필요가 없습니다. 삼베를 천 접착제와 함께 잡고 정말 독특하게 만들고 싶은 장식을 추가하십시오.
DIY 지침 – Allthumbscrafts 
애국적인 요요 캔들 랩
7 월 4 일이 다가오고 있으며이 캔들 랩은 야외 파티 및 장식에 적합합니다. 작은 천 요요는 삼베 조각으로 만들기 쉬운 캔들 랩을 장식합니다. 필요한 크기를 선택한 다음 패브릭 접착제를 자르고 사용하여 랩을 함께 유지하십시오. 그런 다음 Yo-Yos 패브릭으로 장식하거나 원하는 다른 장식 형태를 선택할 수 있습니다. 전통적인 유리 캔들 홀더를 사용하거나 정말 창의력을 발휘하여 오래된 유리 병과 항아리를 재활용 할 수 있습니다.
DIY 지침 – Thecountrychiccottage
액자 편지 벽걸이
모노그램은 집을 꾸미기에 아주 좋으며 이것은 나무와 삼베로 만들어져 정말 독특하고 정말 화려합니다. 나무 편지를 구입하고 (또는 올바른 도구가 있으면 잘라 내고) 원하는 색상으로 칠해야합니다. 일치시킬 프레임을 가져 오거나 오래된 프레임을 사용하여 페인트하십시오. 뒷면은 삼베이고 글자가 올라와있어 3D 효과가 뛰어납니다. 이것은 정말하기 쉽고 이번 여름에 결혼하는 사람을 알고 있다면 멋진 결혼 선물이 될 것입니다.
DIY 지침 – Newideasforyou
삼베 직물 상자
공예 용품, 바느질 또는 뜨개질 재료 또는 원하는 모든 것을 편리하게 보관하고 훌륭한 삼베 패브릭 상자로 정리하십시오. 이 상자는 멋지게 보일뿐만 아니라 만들기도 매우 쉽습니다. 이 프로젝트는 약간의 재봉이 필요하지만 초보자도 쉽게 할 수 있습니다. 상자 내부에 사용할 천을 선택하는 것이 좋을 것이며 제작하는 데 몇 시간 밖에 걸리지 않을 것입니다. 욕실을 정리하거나 잡지 홀더로 사용하기에 좋습니다.
DIY 지침 – Ecokaren
프랑스어 영감 잡지 랙
(아마도 화장실에) 잡지를 던지는 경향이 있다면,이 잡지 꽂이는 필수품입니다. 만들기가 정말 쉽고 처음부터 끝까지 1 시간도 채 걸리지 않습니다. 삼베가 접혀서 잡지를 말아서 제자리에 밀어 넣으면됩니다. 원하는대로 장식 할 수 있지만 프랑스 디자인에서는 정말 좋아 보입니다. 집에있는 모든 욕실에 하나씩 만들거나 주방에서 모든 요리 잡지를 보관하는 데 사용할 수 있습니다.
DIY 지침 – Thegraphicsfairy
No-Sew 러플 트리 스커트
크리스마스 시즌에 공예품을 시작하기에는 너무 이르지 않았습니다. 이 아름다운 DIY 프릴 트리 스커트는 삼베로 만들어졌으며 절대 바느질이 필요하지 않습니다. 시간이 좀 걸릴 수 있지만이 치마 아래에 나무가 얼마나 멋지게 보일지 상상해보세요. 뜨거운 글루건을 사용하여 모두 함께 고정하면 프릴에도 놀랍게도 잘 작동합니다. 이제 온라인에서 $ 100가 조금 넘게 구입할 수 있지만 약 $ 20 정도에 만들 수 있는데 왜 그렇게 하시겠습니까?
DIY 지침 – Eevanad
삼베 사진 화환
삼베 화환을 만들 계획이라면 실제로 맞춤화하고 가족 사진을 추가하는 것은 어떻습니까? 어머니의 날에 정말 독특한 것을 찾거나 직접 만들어보세요. 멋진 선물 아이디어입니다. 사진은 조화로운 색상의 리본으로 묶여 있으며 전체적인 모습은 단순히 화려합니다. You start with a wreath form and some wired burlap ribbon and from there, you can actually customize it just about any way you want to make it totally unique.
DIY Instructions – Thistlewoodfarms
Tufted Burlap Headboard
If you are looking to redo the bedroom, this burlap headboard is the perfect place to begin. Rustic and charming, you can actually make it in whatever size you need for your specific bed. It is really easy and the completed look is lovely. Add some burlap throw pillows and you can completely change how your bedroom looks in less than a day. It doesn’t take nearly as much material or as much time as you may think to create this look and you can embellish with burlap buttons or just anything you want.
DIY Instructions – Thestudiolo
No-Sew Burlap Bow Ties
Imagine your country wedding complete with burlap bow ties. These adorable little ties require absolutely no sewing and they are clip-ons so there are no worries of your guys being able to tie them when they are finished. These take so little time to make and very little fabric for each one so if you are planning a rustic wedding with burlap accessories, a couple of yards will go a long way in making all of the bow ties that you need.
DIY Instructions – Weddingwindow
Stamped Burlap Ornaments
Instead of using the same plain old ornaments this coming Christmas, why not spruce it up a bit by making these adorable stamped burlap ornaments? The project involves putting burlap around foam balls (which by the way are very inexpensive) and then stamping your message across them. You can display any message you want and these would also look great on wreaths or just in a bowl by the front door for added decoration.
DIY Instructions – Blissbloomblog
Stenciled Magnetic Board
Add a little style to those organization areas with an easy to make stenciled magnetic board. The stenciling makes it as elegant or whimsical as you want it to be so you could use it as an art piece which also doubles as a functional magnetic board. Just stencil in whatever pattern you want and if you want, you can add a few embellishments made from burlap like flowers, ribbons or bows. Tie a ribbon or use twine to give it a hanger.
DIY Instructions – Domestically-speaking
Burlap Project Bin
What better place to store all of those crafting supplies than in a great DIY burlap bin? This is a really easy project that won’t even take you a day to complete and once you are finished, you will have a wonderful place to store just about anything. A little burlap, some upholstery tacks and some small wooden bins (think the types that oranges come in) and you’re all set to create an attractive bin that could be used for any number of organization projects.
DIY Instructions – Gardenhouseliving
No-Sew Stenciled Burlap Pillows
Twine bows are used to hold this adorable burlap pillow together so there really is no sewing involved. It’s a great project if you have a couple of hours to spare and the time really depends on how complicated your stenciling is. If you just want a small picture or message, you can finish this up in less than an hour. The twine around the edges is a really nice touch and it gives it a great country feel and all with absolutely no sewing required.
DIY Instructions – Debbie-debbiedoos
Coffee Bag Purse
Forget paying hundreds of dollars for a Dior original. You can make this adorable coffee sack purse yourself for less than $10 – depending on the materials that you have on hand. You will need an old book for the supporting frame and then you just have to sew it all together. It’s actually a lot easier than it looks and you will end up with a bag that very strongly resembles Dior’s coffee bag purse only you’ll have a few hundred dollars left over. If you’re not a fan of the coffee bags, just use plain burlap and maybe a few stencils to get the design that you want.
DIY Instructions – Trinketsinbloom
Burlap Garland
To create a lovely burlap garland, you really don’t need anything except the wired burlap ribbon and some string for hanging. You will need something to weave the ribbon in and out of the burlap but you can use a safety pin or bobby pin for that. Then just bunch up the burlap to create a great poufy ruffled look and tie it up. You can use this for Christmas decorating or just have it on the mantel whenever you need a little extra something.
DIY Instructions – Southerndiydiary
Spring Banner Lampshade
A mason jar is the base for this adorable lamp that has a burlap covered lampshade. While you can buy a lampshade in burlap, it is a lot cheaper to just cover an old one yourself. The best part of this little lamp is the spring themed banner than runs along it. Colorful ribbons complete the look. You could also have spare banners in fall colors or in a Christmas theme so that you can change it around whenever the seasons change.
DIY Instructions – Redberrybarn
Burlap Purse with Shabby Rose Decoration
If you want a really easy sewing project and you are in the market for a new purse, this shabby rose purse is a great choice. The rose is made of burlap and in a contrasting color, it really stands out. You can complete this project in a weekend or even in a day if you are quite the seasoned sewer. It would make a wonderful gift for someone who likes things on the unique side or just make it for yourself. It has loads of room on the inside and is much easier to make than it looks.
DIY Instructions – Lamaisonreid
Barrel Shade Chandelier
While you may not be able to make this entire chandelier, you can certainly make the barrel shade that covers on it. The shade is completely covered in burlap which makes it both elegant and rustic at the same time. You may be surprised at how easy it is to create this look, which would be perfect in a foyer or formal dining room. The entire look will cost you less than $15 and take only about an hour or so to complete.
DIY Instructions – Burlapanddenim
Floral Burlap Clutch
This lovely clutch is both simple and inexpensive to make. You can do it in whatever colored burlap you have on hand or whatever you want and then create the flowers in contrasting colors to make them stand out. This is a great bag for evenings out and easy enough for teenagers to make just in case your daughter wants to create something special for prom. The shape and size of an envelope makes it perfect for times when you don’t have a lot to carry with you.
DIY Instructions – Anightowlblog
Patriotic Burlap Flag
Dress up your front door for the Fourth of July with this great patriotic burlap flag that you can make in less than an hour. You will need a bit of burlap and some blue fabric – denim works really well – as well as the cover of a hardback book to create the shape. You just create a flag with your material and then hang it with twine or another similar material. This is actually great for displaying all year and is so very easy to make, not to mention very inexpensive.
DIY Instructions – Somewhatquirkydesign
Vintage Inspired Feedbag Pillows
You don’t actually have to find vintage feedbags to have pillows that resemble them. You can easily make them yourself and dress up your bed in a great rustic way. You will need to paint the lines so that they resemble vintage feedbags and these work great with burlap. Then just sew the ends together, stuff with whatever you prefer in your pillows and seal it all up. You can also use stencils to create whimsical or vintage sayings on the pillows so that they really look authentic.
DIY Instructions – Retropolitanhip
Vintage Wire Basket
This rustic looking basket would make a wonderful hamper in your bathroom or bedroom or you could make a smaller version and use it for magazines or anything else you need. You just line the inside of the vintage wire basket with burlap and then add any decorations or adornments that you want. If you are using it for décor, just add a few burlap pillows to the top and you’re all set. You could also use it for a gift basket and fill with various other burlap type décor.
DIY Instructions – Gailsdecorativetouch
Burlap and Tin Can Vase Garland
A few up-cycled tin cans and some burlap will give you all you need to create this beautiful garland that you can actually plant flowers in. This would look great anywhere that you need to add a little color or greenery. You could use it in the kitchen for growing herbs or hang it on the porch with seasonal flowers in it. Make sure that you clean the tin cans really well and use a can opener that removes the complete top so that there are no sharp edges. Then just cover with burlap and hang with twine.
DIY Instructions – Foxhollowcottage
Burlap Flower Pot
These burlap flower pots are the perfect way to keep your plantings organized this spring. You can use them for flowers or even vegetables or herbs. You just cover a five gallon bucket with burlap, secure it and then label your pots however you want. Hang some twine around the bucket to hold the label in place and your plants will remain perfectly organized so you’ll always know which ones are which, even before they begin growing. This is a great idea for yards that don’t really have garden space.
DIY Instructions – Too-much-time
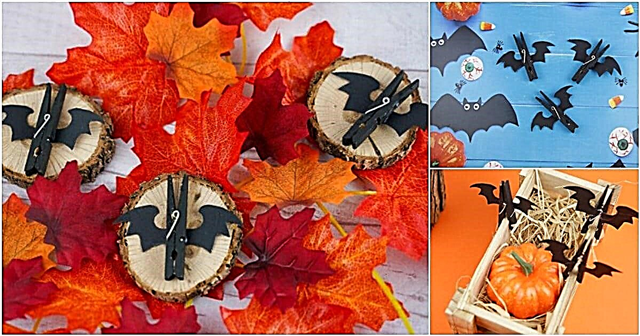
Burlap Fall Leaf Decorations
In just a few minutes, you can cut out multiple leaves from burlap to create gorgeous fall decorations. You merely have to trace the leaf shapes and then cut them out. If you love using mod podge, you can use that to hold your leaves onto real twigs or anything that you want to decorate for fall. String them all together and create a banner or just have multiple twigs in a glass vase and display your leaves in their natural habitat. This is a great little project that will help you along with other projects.
DIY Instructions – Foxhollowcottage
Burlap Tiki Torches
Save those empty wine bottles this spring and by summer you could have several gorgeous burlap tiki torches lighting up your outdoor living spaces. If you paint the bottles before you begin, you could have very colorful lighting or you could leave them clear – whichever way you prefer. Make a few burlap flowers to decorate them and then simply create the tiki torches which you can use on your outdoor table or affix them to poles and stick them all around your yard. Burn citronella oil in them to get a nice glow that also wards off pesky bugs.
DIY Instructions – Hometalk
Burlap Baker’s Apron
You can make this really great baker’s apron with no sewing whatsoever. You simply have to cut the burlap (you can use a burlap bag to get the writing that you want) and draw in armholes to cut out. Then just cut out the apron form and use a good fabric glue to attach the black seam. This will also keep the burlap from fraying and it looks great as a contrasting background. These would be perfect as gifts for anyone you know who loves to bake or make one for the special Dad in your life for Father’s Day – he can do all of his grilling in style.
DIY Instructions – Gailsdecorativetouch
Reupholstered Burlap Chair
Instead of throwing out that old chair that seems to be falling apart, why not reupholster it in burlap? If you don’t have an old chair to use for this project you can probably pick one up at a flea market or yard sale for really cheap. Reupholstering is much easier than you may think and when you are finished you will have a beautiful chair that looks great in any room. Add a burlap pillow and it will look even better.
DIY Instructions – Beneathmyheart
Burlap Flowered Lampshade
Take that old lamp that is in serious need of a makeover and create this beautiful flowered lampshade. You can use a new lampshade too if you want. Just create the flowers from burlap and then cut a thin strip for the top and bottom to bring it all together. You can glue the flowers and accents on with hot glue and even cover the entire lampshade if you prefer. This would be great done in different colors of burlap to really make the flowers stand out or you could just stick with a neutral color.
DIY Instructions – Laughterandgrace
Burlap Clothespin Bag
If you love drying clothes outside when the weather permits – not only do they smell wonderful but you can save a lot of energy this way – then you’ll definitely want to put together this burlap clothespin bag. It hangs right on the line so your pins are right there where you need them. You can use a burlap coffee bag that’s already put together or use fabric glue. After all, those clothespins really don’t weigh that much.
DIY Instructions – Apartmenttherapy 
Fringed Burlap Table Runner
Table runners are great for decorating and this fringed burlap runner will be a beautiful addition to your dining room table. You simply have to cut the burlap to fit the length that you need and then go through and fray the edges a bit, tying them off so that they don’t continue to fray in the future. This is a really simple project and tying the frays is actually the most time consuming part. You can easily finish this in a weekend and although there is a little sewing required, there’s not much so even if you are new to sewing, this is a great project for you.
DIY Instructions – Cottageandvine
Burlap Sunglasses Case
Keep those sunglasses safe and clean with a burlap sunglasses case that you can make yourself in just about an hour or so. This project requires a bit of sewing and you will want to choose a fabric to line the case so that your glasses don’t get scratched. You can choose whatever way you want to close the case but button closure on the front of this one works really well and is relatively easy to create. These would make great gifts so if you want something really unique for someone special, make them a burlap glasses case. They are sure to love it as much as you do.
DIY Instructions – Craftingagreenworld
Burlap Chevron Paintings
Chevron is a very popular design these days and if you want to add a bit of this design into your décor, these burlap paintings are a great way to do so. You just have to create the design on your burlap and then frame your finished result. These can be done in any color you want and they are so easy to do. Make them in whatever size you want, use whatever colors you want and you can even toggle the size of the design a bit, too.
DIY Instructions – Glueandglitter
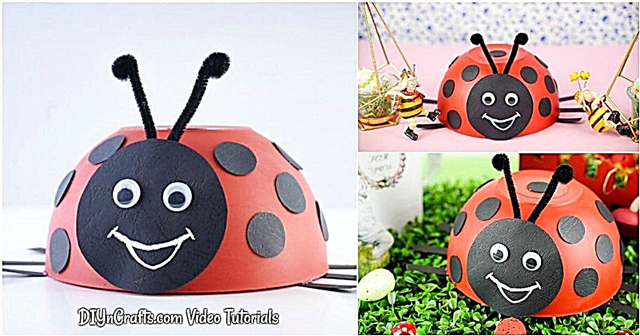
DIY Burlap Canvas
Create a beautiful canvas for your home with burlap, a store bought canvas and whatever design or message you want to display. If you are redoing a specific room in burlap, these canvases are a must. You simply cut the burlap to cover a canvas (or several of them if you want something really large) and then paint on the message that you want to display. This is one of the easiest projects ever and it allows you to be completely creative. You could use stencils or just freehand your message to make it look really rustic and charming.
DIY Instructions – Happytogethercreates
Thanksgiving Place Cards
Ok, so you don’t have to use these only for Thanksgiving but they will look great on your holiday dinner table. These burlap place cards are very easy to make and will take very little time so even if you are planning to have several guests for dinner, you can easily make a place card for each one of them. The center is made from chalkboard paint so they are easily reusable with other guests and you can embellish them with leaves or just anything else that you feel like using.
DIY Instructions – Thecountrychiccottage
Pottery Barn Inspired Burlap Candle
If you love Pottery Barn but just can’t bring yourself to pay some of the prices there, you are going to adore this Pottery Barn knockoff candle made from burlap. You can do these in any size you want. You just have to have a candle on hand that you will cover with burlap. Mod podge holds the burlap in place and once you have the burlap on, you just paint over it with gold paint which gives it that great Pottery Barn look without the cost.
DIY Instructions – Myloveofstyle
Burlap Prints
Printing on burlap is not nearly as difficult as it sounds and once you master that craft you can create these beautiful burlap prints that can be framed or hung on their own. You could make several of these and use them as gifts. Everyone loves burlap and who wouldn’t love their own framed print in burlap? You just choose the message that you want and then print it off directly on your burlap fabric. It’s really easy to do and it allows you to create wonderful prints and gifts that will take you literally only minutes to make.
DIY Instructions – Creativetryals
Burlap Jewelry Box
An old cigar box (a wooden one) and some burlap put together create this adorable jewelry box that will be great for keeping your rings and other jewelry perfectly organized. You will need to cut the burlap so that it just fits the width of the box and then cut it long enough so that you can roll it up and stuff inside the cigar box to hold your rings and other jewelry. If you know someone who loves unique gifts, this would be a great one. You can also paint the box if you want but it looks wonderful in its natural color.
DIY Instructions – Mrkate
Bathroom Subway Art
Subway art has become very popular and what could be better than printing that subway art onto burlap. This bathroom subway art is a beautiful way to decorate the powder room and you can colored stones that you can find at your local craft store to decorate it a bit. Just print the subway art off onto your burlap, frame it and then decorate around it. It’s really simple and something that will take you literally only minutes to put together.
DIY Instructions – Domestically-speaking
Burlap Dry Erase Calendar
Keeping the family organized can be difficult. Most people have a calendar of some sort to help them to keep things together and this burlap calendar is a great choice. You can draw the calendar however you need onto the burlap and then simply frame it in a glass frame. The glass is easily written on and then erased away if you use a dry erase marker. You can be very creative and choose frames of any color and even add a few embellishments if you want. This is a great project for organizing your home and using a bit of that spare burlap as well.
DIY Instructions – Simplykierste
Burlap Storage Bins
Who doesn’t love those handy storage bins? They are after all, perfect for keeping things neatly organized and when you make them from burlap, they are just as decorative as they are functional. You will want to have a few boxes on hand to cover but you can use old diaper boxes or anything that is the size that you need. After all, you will be covering them completely with burlap so it doesn’t really matter what they were in a previous life. Once you finish, you can use these to organize virtually every room in the house. They are easy to make and if you have burlap and boxes, they may not cost you anything, either.
DIY Instructions – Blissfulkeeperathome
Burlap Table Bouquet
If you are planning a burlap wedding, these little table bouquets will be perfect for decorating your reception. If you aren’t currently planning a wedding, you can still make these and just use them to decorate around the house. They are simply folded burlap with ribbon tied around to keep them in place and then filled with lovely flowers. You can use whatever flowers you want or decorate them a bit of you want. You can literally make these in about ten minutes each so if you are planning a wedding, this is a really quick way to get those tables decorated.
DIY Instructions – Propcloset
Burlap Wine Bags
If you love giving wine as gifts, try making these great burlap wine bags to hold that wine. Each bag takes only about half an hour and you can decorate them however you want. Use stencils to put messages on the fronts or even add burlap flowers or bows. These are very easy to make and take very little material so a yard or two of burlap will make several of them. Just tie the top up with ribbon or use twine to really make the bag look rustic.
DIY Instructions – Michaels
Recycled Patron Vase in Burlap
Patron bottle vases are elegant and adorable and you can really dress them up with a little burlap. Just cover the vase in lace and then cover the center of the lace with burlap or you could do this vice-versa and put the burlap as the backing. These are great for decorating for parties because they are inexpensive and very easy to make so if you need several, they won’t take days to make or cost you a fortune. Add a flower to each one and you’re all set.
DIY Instructions – Diyinspired
Burlap Wedding Invitations
If you are planning a wedding that uses a lot of burlap, why not incorporate the look into your invitations? With some card stock, a printer and a little burlap you can create beautiful invitations that are sure to be a huge hit with family and friends. These are also great for summer parties and other special occasions when you need to send out invitations. You could also use them as wedding programs to let everyone know who is in the wedding and the venue that you will be following.
DIY Instructions – Intimateweddings
Burlap Boutonniere
Whether you are planning a burlap wedding or you have a special someone going to the prom, these burlap boutonnieres are a great choice. You can cut the form out of an empty cereal box so if you already have the burlap and a few other supplies on hand, you won’t have to spend anything to make these. You could add baby’s breath or other flowers to them and actually customize them to perfectly match any wedding theme. And, they’re a lot cheaper than boutonnieres that you purchase from the florist.
DIY Instructions – Greenweddingshoes
Burlap Door Hanger
Whether your family is filled with football fans, baseball enthusiasts or any other sport, you can create a wonderful door hanger that suits your family perfectly. This burlap door hanger is really easy to create and can be completely customized to fit your family’s favorite sport and favorite team. You just have to cut the burlap to match the form that you need (football, baseball, etc.) and then sew it together and stuff. Once you’re done you can decorate with bows or just anything that makes it special.
DIY Instructions – Greatdaygraphics
Burlap Covered Gifts in a Jar
You know how popular gifts in a jar are. Well, this is a burlap twist on those popular gifts. When decorating your jars, add burlap to the top and then some twine or jute rope for tying. You can use smaller jars and give them away as party gifts or create larger ones and use as gifts for special occasions. The burlap really gives the jars a homey look and you can fill them with your favorite recipes or even jellies, jams or any other yummy goodness.
DIY Instructions – Tinyprints 
Burlap and Mason Jar Storage
Old mason jars and some burlap work really well together in creating this wonderful storage shelf that you can use in bathrooms, kitchens or anywhere you need it. You simply cover a piece of wood with burlap and then affix your jars, which will need to be secured with clamps. These are great for holding Q-tips and cotton balls in the bathroom or you could use them in the kitchen for housing your wooden spoons. The entire project takes less than an hour and gives you a beautiful storage solution.
DIY Instructions – Putitinajar
Burlap Owl Wall Hanging
The kids are going to love helping you to create this whimsical owl from burlap. You need burlap, felt and a few craft supplies and then you can hang your little owl on his own tree branch. Frame it and you have a beautiful wall hanging that is sure to bring a smile to everyone who sees it. This project does not require any sewing. You can glue everything together with a hot glue gun and it’s so easy that you may end up adding more than one owl to your little tree.
DIY Instructions – Urbanhoot
Burlap Picture Matting
If you really want your pictures to stand out when you hang them, replace the matting behind them with burlap. This is a great way to make your entire photo display look rustic. You can purchase frames at the Dollar Store for around a dollar each and then make them really special by adding the burlap and some scrapbooking paper to create a unique mat for each picture. You don’t have to sew or even glue for this one. Just add the burlap and then the picture and the glass from the frame will keep it all in place.
DIY Instructions – Twostorycottage
DIY Burlap Advent Calendar
You can create a beautiful Advent calendar using burlap or you could turn this into a Christmas countdown calendar if you wanted. Actually, you could use it as a normal calendar if you want, just be sure to add a label for each month. If you are making and Advent calendar, you can fill the numbered pockets with small candies or gifts or use plain labels instead of pocketed ones to create a regular calendar. Either way, this is a really easy project and one that won’t cost much, either.
DIY Instructions – Onsuttonplace
Burlap Christmas Trees
These beautiful burlap Christmas trees are inspired by Pottery Barn but they cost much less. You can do these in alternating colors or alternate the burlap with canvas to make them a bit unique. You can make them as tall or short as you want, depending on the size of the cones that you use and you can make them fuller by simply adding more fabric. Once you’re finished, decorate if you want or just leave them plain. There is no sewing required so this is a project that everyone can do and the kids will love to help with it.
DIY Instructions – Myhappynest
Burlap Boot Stuffers
Ok, so this is not technically a décor project but it’s a very helpful one anyway. These burlap boot stuffers are great because they are quick and really inexpensive to create and they work perfectly for keeping your boots from drooping. Two boot stuffers takes only a yard of burlap to create so you can make several of these if you have more than one pair of boots. These are also great for gifts and there is very little sewing required.
DIY Instructions – Shinewithjl